
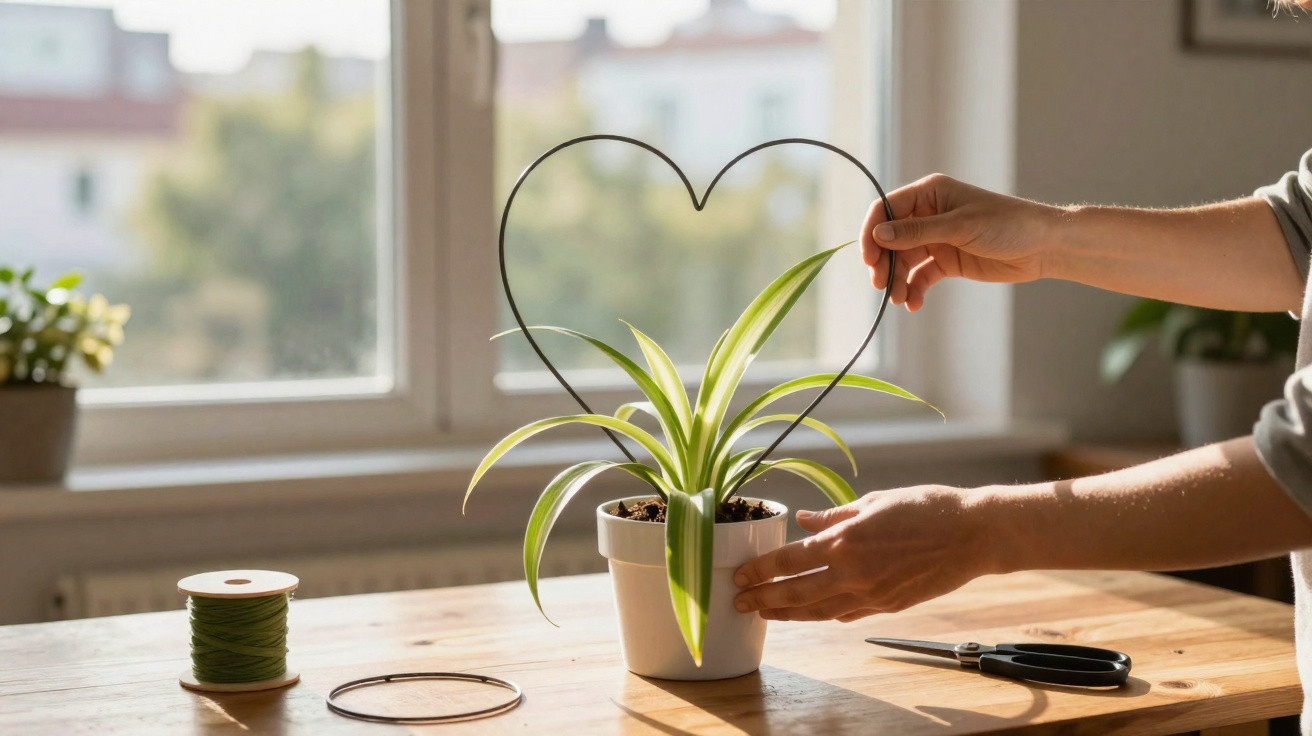
Most people relegate the spider plant to the role of easy background greenery rather than treating it as a focal point.
That can shift in an instant.
Whether it’s perched on a bookcase or spilling over a windowsill, Chlorophytum comosum rarely demands much notice. But with one unexpectedly straightforward tweak, this laid-back houseplant can become a bold, sculptural statement-something that feels closer to botanical design than a bargain supermarket purchase.
From throwaway houseplant to living sculpture
The spider plant’s real trick lies in what many view as mess: the long, wiry runners draped with baby plants. Every arched runner finishes in a small rosette called a plantlet. If you ignore them, they sprawl and trail in all directions; if you guide them, they can trace deliberate shapes through the air.
"Think of your spider plant less as a floppy mass of leaves and more as a flexible, living material you can bend into shape."
Because these runners are naturally thin and pliable, they cope well with careful, gentle shaping. That makes them perfect for simple “green sculptures” that don’t call for specialist kit or advanced horticultural know-how. You’re simply harnessing what the plant already does well: keep producing more dangling plantlets.
Why spider plants are perfect for home plant design
Before you start shaping anything, it’s worth getting the basics clear:
- Species: Chlorophytum comosum
- Origin: South Africa
- Key feature: Long, arching stems with hanging plantlets
- Pet-friendly: Non-toxic to cats and dogs
- Skill level: Very forgiving, great for beginners
That mix-tough, pet-safe, and constantly generating new offshoots-makes the spider plant ideal for indoor “plant architecture”. Rather than letting the runners creep into a corridor or cascade in a jumble over a sideboard, you can collect them and give them a clear role.
Creating shapes: hearts, circles and crowns
Step 1: build a light frame
A straightforward way in is to make a simple metal outline. Soft aluminium craft wire is a good choice: sturdy enough to hold a form, yet easy to shape by hand. Gardeners often use something similar to a 9-gauge wire.
Form the wire into:
- a circle, to create a wreath or crown
- a heart, for a romantic or playful accent
- a loose oval, if you want a more natural, flowing look
Press both ends into the compost so the frame stands upright, or fasten it by lightly twisting it around a small support stick in the pot. Aluminium is useful here because it’s lightweight, slow to rust, and won’t drag the plant down.
Step 2: select the best stems
Study your plant and choose your “working” stems. Some runners will be longer, stronger, and more heavily loaded with plantlets than others-those are the ones best suited to your shape.
"Pick the longest, healthiest stems and treat them as your “brushstrokes” on the green canvas."
From the base of the plant, ease each chosen runner along the wire. Avoid yanking or forcing sharp turns; instead, curve it so it settles naturally against the frame. Fix it in place using soft ties, small pieces of raffia, or flexible garden clips.
If the plantlets are crowded in one area, you can trim a few away. Pot them up elsewhere, or tuck them into the original pot to build a thicker, fuller tuft of foliage at the centre.
Step 3: let the drawing fill out
Over the following weeks, the plantlets will put on growth and the outline you set will read more clearly. A basic wire ring can develop into a dense green wreath, and a heart shape can become bolder and more defined as the rosettes enlarge.
Since the plant continues to send out fresh runners, you can keep refining the design and adding to it as you go. It’s closer to gradually constructing a piece than completing it in a single afternoon.
Braided columns: turning a spider plant into a totem
If neat outlines and geometry aren’t for you, a vertical braid creates a very different visual. You still use the same runners, but instead of wrapping them around a frame, you plait them together like hair.
How to create a braided spider plant column
| Step | Action |
|---|---|
| 1 | Gather three to five long, flexible stems with plantlets. |
| 2 | Place a straight wooden stake or bamboo cane in the pot as a central support. |
| 3 | Start braiding the stems loosely around each other, keeping them close to the stake. |
| 4 | Use soft ties at a few points to secure the braid against the stake. |
| 5 | Adjust plantlets so they face outward for a fuller, textured column. |
The finished effect is a slim, upright “green totem” that immediately adds height. It sits well beside an armchair, at the end of a TV unit, or next to a bookcase-places where vertical space often goes unused.
Where to place your new green sculpture at home
Once the form begins to hold, where you put it matters as much as how you shaped it. With thoughtful positioning, a standard spider plant can read as a designer object.
- Centrepiece wreath: A circular crown looks great in the middle of a dining table. The plantlets can drape softly over the edge without interrupting conversation or sightlines.
- Heart on a console: A heart frame on a hallway console or sideboard creates a welcoming, slightly playful note.
- Vertical braid in a corner: A braided column suits tight spaces that feel bare but can’t take bulky furniture.
- Mini-column on a bedside table: A shorter version in a smaller pot brings a calm green presence to a bedroom without adding visual clutter.
"By shaping the plant upward, you gain space on the surface while drawing the eye to a distinctive, living object."
Aftercare: keeping your plant- sculpture healthy
After bending and securing the runners, give the plant a little help so it can recover and keep growing with vigour. A gentle feed with a simple liquid fertiliser-typically a balanced two-component product with nitrogen and potassium, applied at half strength-can help it rebound.
Water only when the top layer of compost begins to dry rather than sticking to a rigid timetable. Overwatering is still one of the few genuine risks for spider plants. Aim for free-draining compost so the roots are never left sitting in waterlogged conditions.
In frost-free climates, particularly USDA zones 10 and 11, spider plants can also be grown outdoors. They manage well as long as night-time temperatures remain above about 13°C (55°F). In that situation, your sculptural plant can spend summer on a sheltered terrace and then return indoors before cooler weather arrives.
Common mistakes when shaping a spider plant
Shaping is generally kind to the plant, but a handful of familiar mistakes can put it under pressure:
- Forcing runners into tight bends or moving too quickly, which can snap them.
- Choosing wire that’s overly rigid or too thin and ends up cutting into the stems.
- Securing stems with rough, tight string that rubs and damages plant tissue.
- Neglecting light: a sculptural plant still needs a bright position, out of harsh midday sun.
If a runner does break, there’s no need to worry. Trim it neatly near the base and use any healthy plantlets as cuttings. Spider plants root readily in compost or water, so a small slip can still produce more plants.
Going further: pairing and seasonal experiments
Once braiding and guiding runners feels natural, you can start combining your spider plant with other elements. A simple metal frame set into a heavy ceramic pot can look more like a gallery piece. During festive periods, some people thread a subtle string of micro-LED lights around the frame, keeping cables lightweight and away from the compost.
You can also experiment with different set-ups: a heart for a bedside table, a circular crown around the base of a taller indoor tree, or a twin-column look using two pots placed side by side. Because the plant responds relatively quickly, you can refresh the design throughout the year without starting over.
For anyone who finds topiary or bonsai intimidating, the spider plant is a far more approachable gateway into living sculpture. It tolerates missteps, costs little, and turns a plant you might have overlooked into a small everyday pleasure-something you actually stop to look at, rather than simply walking past.

Comments
No comments yet. Be the first to comment!
Leave a Comment