
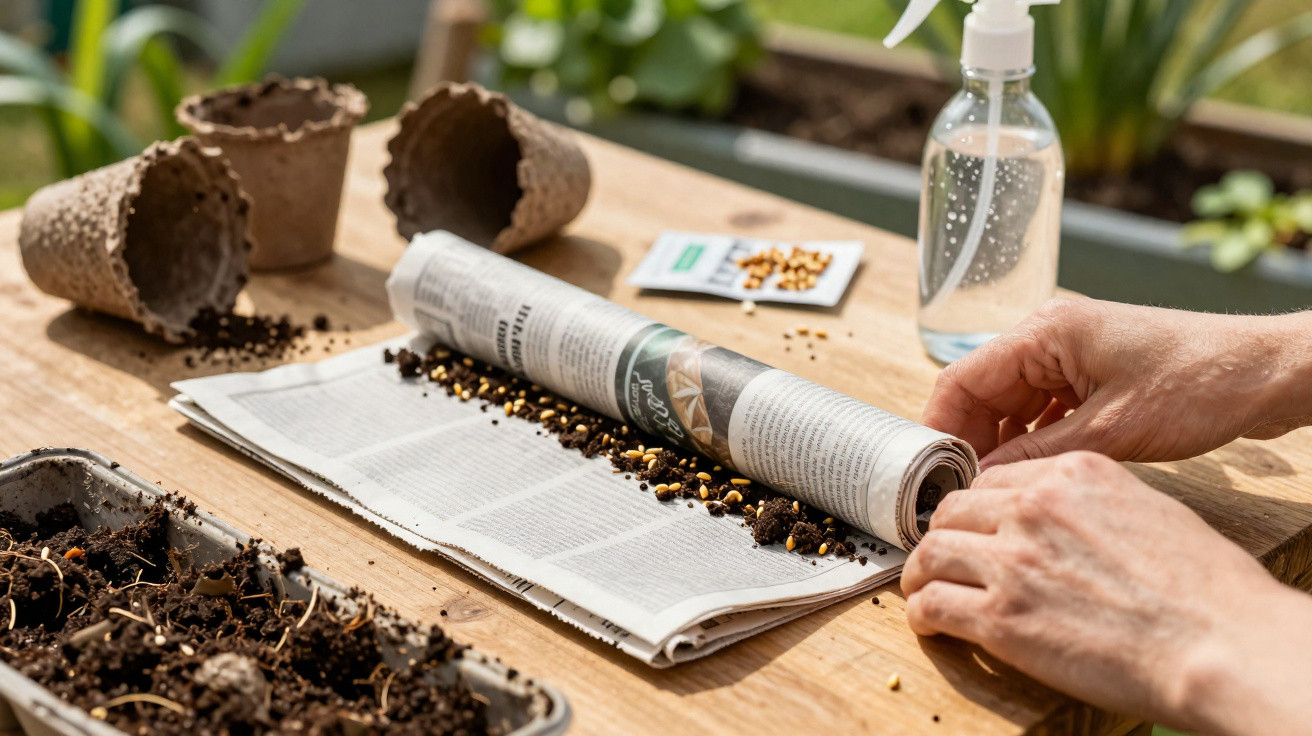
Rather than piling up plastic trays and purchasing fresh pots every spring, more gardeners are starting scores of seedlings inside a tightly rolled “snail” made from reused materials, taking up barely any room.
The everyday object replacing seedling pots
The trick is not a specialist tool at all. It uses items many households discard without thinking twice: old plastic bags or even strips of newspaper.
Growers shape these bendy materials into what is commonly called “snail sowing” or a “seed roll”. In practice, a flat strip of plastic or paper is layered with something absorbent and a little compost, then rolled into a neat coil with seeds tucked inside.
By rolling their seeds into a compact spiral, gardeners can raise an entire tray’s worth of seedlings using the footprint of a mug.
It has been spreading through gardening blogs, forums and social media, especially among people looking to reduce reliance on plastic pots, keep costs down, or raise seedlings where space is tight.
What is the “snail” sowing method?
The snail approach starts seeds in a spiral roll instead of separate pots or a standard seed tray.
The basic method is simple: take a long flexible strip, add a moisture-retaining layer, sprinkle on a thin bed of seed compost, set out the seeds, and then roll everything up into a coil.
The finished roll looks like a cinnamon bun of compost and seeds, standing upright in a shallow dish with a little water at the bottom.
Why gardeners are adopting this trick
There are a handful of down-to-earth reasons this idea is catching on quickly.
- Space saving: One snail roll can hold dozens of seedlings while taking up no more room than a saucer.
- Low cost: It mostly depends on what you already have at home: supermarket bags, used compost sacks, or newspaper.
- Less plastic waste: Soft plastics can be repurposed rather than going straight into the bin.
- Easy transplanting: When the plants are ready, you unwind the roll to reach each seedling with very little disruption to the roots.
For people gardening on balconies, students, or anyone renting a small flat, the space-saving aspect is a major draw. A sunny windowsill can fit four or five rolls, each capable of producing a mini “army” of salad leaves, herbs, or flowers.
What you need to make a seed “snail”
Nothing here is fancy, but using the right combination makes the process much easier.
| Item | Role in the method |
|---|---|
| Plastic bag or newspaper strip | The outer layer that supports and holds the roll |
| Kitchen towel or thin fabric | An absorbent layer to keep moisture consistent |
| Fine seed compost | The growing medium for germination |
| Seeds | Vegetables, herbs, flowers – anything small-seeded |
| Shallow dish or saucer | Keeps the roll upright and holds a small amount of water |
A common approach is to cut a 10–15 cm-wide strip from an old compost bag or a sturdy carrier bag. Newspaper can do the job too, though it degrades faster and usually needs more careful watering.
Step-by-step: how the snail is built
1. Prepare the strip
Spread out the plastic or newspaper and cut a long strip roughly the width of your hand. A longer strip allows more seeds, so some gardeners join two lengths with tape to increase capacity.
Lay a sheet of kitchen towel, or a narrow piece of thin fabric, along the strip. This layer helps retain moisture and stops compost dropping out as you roll.
2. Add compost and moisture
Distribute a shallow layer of fine seed compost along the full length, keeping a small gap at the top edge so compost does not spill out during rolling.
Dampen the compost lightly so it feels like a wrung-out sponge rather than dripping wet. If it is too soggy, seeds may rot before they germinate.
3. Position the seeds
Set the seeds in a line on the compost, leaving a few centimetres between each one so there is space for later stems and roots.
Spacing the seeds properly inside the roll makes later transplanting calmer and far less fiddly.
Salad leaves, basil, petunias, and brassicas are popular choices because they are small-seeded and tend to germinate quickly. Bigger seeds, such as beans, can also be used, although they make the roll thicker and more cumbersome.
4. Roll and stand the snail
Starting at one end, roll the strip up steadily-firm enough to hold its shape, but not so tight that the seeds are squashed. The goal is a compact spiral rather than a rigid log.
Stand the finished roll upright in a saucer or shallow container. Add a small amount of water to the base so moisture can wick upwards through the absorbent layer, then place it somewhere bright and moderately warm.
Caring for seedlings in a roll
Over the next few days, the main priorities are sufficient light and controlled watering.
- Test moisture daily by touching the surface of the compost; it should be faintly damp.
- Refill the saucer when it dries, but do not leave the base sitting in deep water.
- Keep the roll on a bright windowsill or under a grow light so seedlings do not become leggy and weak.
Many seeds germinate within a week or two. Once the first true leaves appear-the second set after the initial seed leaves-seedlings are generally ready to move into individual modules or out into beds, depending on the outdoor temperature.
Transplanting from the snail without damage
Where this method really shines is when it is time to pot on. Instead of prising seedlings from cramped cells, you unwind the spiral gradually.
Move the roll to your potting area, lay it carefully on its side, and begin unrolling from the outer edge. Each seedling sits in its own section of compost, with roots naturally pointing down.
Handled gently, the snail opens like a book of seedlings, each one ready to be lifted with almost no root disturbance.
With a small spoon, dibber, or even the handle of a teaspoon, ease beneath each plant and transfer it to its new pot or position in the bed. Water in using a watering can fitted with a soft rose to settle compost around the roots.
What works best in a snail roll?
Different plants respond differently, and gardeners are steadily learning which crops fit this style best.
- Well suited: lettuces, Asian greens, cabbages, leeks, onions, marigolds, cosmos, many herbs.
- More delicate: extremely fine seeds such as celery or some alpine flowers, which can be awkward to space evenly.
- Less ideal: large, vigorous seeds like courgettes and beans that may outgrow the roll in short order.
If you are new to the method, a roll of cut-and-come-again salads or basil tends to deliver quick, obvious progress and genuinely useful plants.
Risks, limits and how to avoid problems
As with any seed-starting technique, the snail method has a few drawbacks.
Because seedlings are grown close together, stale air and excess moisture can lead to mould. Keeping a little distance between rolls and placing them somewhere bright with good airflow helps prevent this.
Another common issue is uneven moisture-wet at the bottom while the top dries out. Rotating the roll now and then, and checking moisture by hand, can help keep conditions even.
Timing matters as well. If seedlings stay in the roll for too long, roots can tangle, making separation more awkward. The emergence of true leaves is a useful signal that it is time to move them on.
Why this method suits thrifty and eco-minded gardeners
Alongside the practical benefits, the snail roll matches a wider change in how many people garden. Home growers increasingly try to avoid buying new plastic, especially after seeing how easily pots crack and accumulate in sheds.
Reusing packaging, newspaper and fabric offcuts fits that approach. Even if the outer layer eventually wears out or breaks down, it has still done a job by raising a tray’s worth of plants without the need for extra containers.
For anyone short on space, working to a tight budget, or simply interested in garden hacks that genuinely deliver, this small spiral of compost and seeds offers a compelling alternative to yet another pile of plastic pots.
Comments
No comments yet. Be the first to comment!
Leave a Comment