
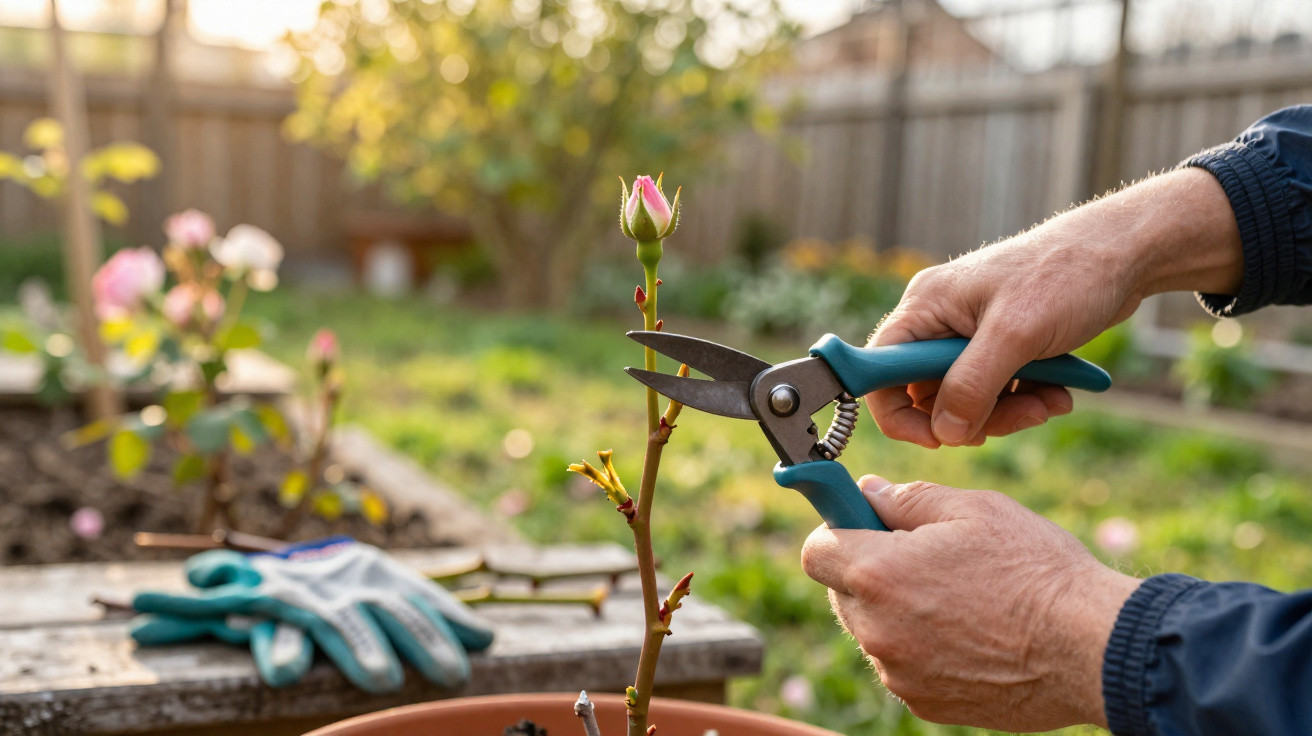
The secateurs snap shut; the air carries a faint, cold-soil scent; and your roses look as though they’ve survived a skirmish. Winter has left blackened tips, dead spurs, and a thicket of thorny uncertainty. You tug on your gloves, study the bare canes, and pause. Do you cut here? Or there? One clumsy snip can feel as if it might wipe out a whole summer of flowers.
A neighbour pops their head over the fence, throws out a breezy, “Just prune at an angle!” and vanishes. Useful… and yet, not really. Which angle? How steep? Above what, exactly?
That’s when it clicks: rose pruning isn’t merely taking wood off. It’s about steering the energy that’s about to rush back through the plant.
The quiet power of a small angle
If you examine a rose cane closely, you’ll spot a small but decisive feature: a little bump on the stem called the dormant bud eye. That’s the point a future flowering shoot can emerge from. The way you angle the cut influences how rainwater drains, how well that bud is sheltered, and even the direction the next shoot is encouraged to take. In practice, it’s like aiming the plant’s “wake up” signal at the precise spot you want.
So when gardeners say “pruning at an angle”, it isn’t just a tired line borrowed from an old handbook. It’s a straightforward, practical technique: help prevent rot at the bud and gently guide new growth towards a better shape.
Imagine a rose bush in early April, still mostly stripped back. On one side, every cane has been cut flat, straight across. On the other, each stem has a slight sloping cut made just above an outward-facing bud. Jump ahead a few weeks. The flat-cut side throws up ungainly shoots-some heading into the centre, crossing over each other, shading, and rubbing. The angled-cut side tends to form a relaxed, open goblet shape, with new stems moving outward into light.
A Yorkshire gardening club once tested both approaches on matching shrubs. The plants with angled cuts showed fewer dieback patches and produced more outward shoots, which meant improved airflow and, by midsummer, noticeably fewer black-spot issues.
The reasoning is simple. A slanted cut-around 45 degrees-acts like a tiny roof, letting rain run away. If the slope falls away from the bud, water is less likely to sit on the cut surface and seep towards the bud eye. Instead, it drains off the far side. Less lingering moisture means a lower risk of rot or fungal trouble right where the new growth is most delicate.
At the same time, placing the cut only a few millimetres above the bud helps concentrate the plant’s healing response and sap flow close to that eye. Leave a long stub and the tip often dies back, opening the door to disease. Cut too tight and you can injure the bud itself. That small “just above the bud” distance, combined with the right angle, is a bit of quiet geometry that sets the rose up for cleaner, stronger regrowth.
The angle rule, step by step
Most seasoned rosarians stick to a consistent guideline: cut about 5–8 mm above a healthy outward-facing bud, using a gentle 45° angle that slopes away from that bud. It shouldn’t be a dramatic diagonal-more like the incline of a book resting slightly open. Choosing an outward-facing bud matters because it’s how you tell the rose, in effect: grow outwards, not into the already crowded middle.
Take a moment to step back and consider the framework you’re creating. Each angled cut functions like a small pointer, encouraging fresh shoots to head towards light and air rather than into a tight, shaded tangle where problems spread quickly.
If you’ve ever ended up with a thick, twiggy knot at the centre of your roses, it’s a familiar story. Summer arrives and the shrub resembles a prickly hedgehog rather than a graceful spray of flowers. Much of that mess starts earlier, when cuts are made without paying attention to both the angle rule and the direction the bud is facing.
The good news is you don’t need specialist equipment or formal training. What you do need is sharp, clean secateurs, a steady grip, and a brief pause before each cut to check three things: Where’s the nearest healthy bud? Which way does it point? Can I tilt the blade so the cut slopes away from it?
A veteran rose grower once told me, “Every angled cut is you having a quiet conversation with the plant. You’re not just removing wood, you’re giving directions.”
- Angle – Aim for around 45°, sloping away from the bud, like a tiny roof.
- Height – Leave roughly 5–8 mm above the bud, not a long stub, not right on top of it.
- Bud choice – Pick an outward-facing bud to open up the centre of the plant.
- Tool care – Clean, sharp blades give a neat cut that heals faster and resists disease.
- Timing – Late winter to early spring, just as buds swell, is the most forgiving moment.
Spring pruning as a quiet reset
Treat spring pruning less like a harsh haircut and more like pressing reset. You aren’t “punishing” the rose-you’re inviting it to rebuild with stronger structure. Applied consistently across the canes, the angle rule becomes a small habit that gradually turns a sulky, leggy shrub into an open, airy framework with sunlight through the middle-one that can properly support generous flowering.
And let’s be realistic: nobody is out there directing every shoot day after day. Spring is your best opportunity, in one deliberate session, to send a clear instruction about where you want the plant’s energy to go.
| Key point | Detail | Value for the reader |
|---|---|---|
| Angled cut direction | Slope away from the outward-facing bud at roughly 45° | Encourages open, airy growth and reduces crowded, disease-prone centers |
| Cut height above bud | Leave 5–8 mm of cane above the bud eye | Protects the bud from damage while avoiding dead stubs and dieback |
| Timing in spring | Prune when buds begin to swell but before strong leaf-out | Maximizes recovery, directs new growth, and minimizes stress on the plant |
FAQ:
Question 1 Do I really need the 45° angle, or is that just gardening folklore? The angle is less myth and more basic physics. It helps water run off and keeps moisture from resting on top of the cut and bud. Your roses won’t die without it, but they’ll heal cleaner and grow stronger with it.
Question 2 What if I accidentally cut too low and nick the bud? If you shave the top of the bud and it looks damaged, don’t panic. Just go a bit lower to the next healthy bud, and repeat the angled cut there. Roses are tougher than they look and often push new shoots from lower eyes.
Question 3 Is it bad if I prune flat on thick, old canes? On very old, woody canes you’re removing entirely, a flat cut at the base is fine. The angle rule matters most on the stems you’re keeping, where you want new growth to emerge next to that bud.
Question 4 How do I find an “outward-facing” bud when the cane is almost vertical? Turn the stem slightly in your hand and spot the bud that aims away from the centre of the plant, even if only a little. It doesn’t have to be horizontal-just not pointing into the middle where everything is already congested.
Question 5 Can I still prune in spring if my roses have already started leafing out? Yes, you can. You may sacrifice a few early leaves, but a careful angled cut above a healthy bud will still redirect energy and tidy the framework. Just avoid pruning if a hard frost is due immediately afterwards.





Comments
No comments yet. Be the first to comment!
Leave a Comment