
Anyone growing tomatoes in the garden or on a balcony can find themselves reaching for the watering can almost every day in summer. Yet fruit still splits, leaves turn yellow and fungal problems take hold. Surprisingly often, the issue is not the amount of water, but how and when the soil is watered - and whether it was prepared properly beforehand.
Why tomatoes get ill despite diligent watering
Tomatoes are extremely sensitive to fluctuations in moisture. If they dry out, then receive a heavy dose of water soon after, the constant swing puts the plants under significant stress.
"Irregular watering quickly leads to cracks in the fruit, weak plants and increased disease pressure."
Garden specialists point to recurring warning signs:
- Split fruit: the skin bursts, making it easy for pathogens to enter.
- Yellow, dry leaves: a clear sign the plant is short of water.
- Limp, mushy stems: often indicates waterlogging around the roots.
- Frequent fungal infection: such as blight after the first rainy days.
Many people try to fix things by watering even more. In reality, that often makes matters worse. Tomato roots cope badly with both permanently soggy conditions and bone-dry soil - what they need is steady, even moisture.
Watering properly: not from above and not all the time
The usual advice from experienced growers is to water tomatoes right at the root zone - less often, but thoroughly. This allows water to soak deeper into the soil and reach the fine feeder roots.
"The ideal approach is: water rarely, slowly and deeply - and direct the water to where the roots are, not onto the leaves."
What matters in practice:
- Water at the base: apply water to the soil by the stem, not over the leaves and fruit.
- Water slowly: give it time to soak in rather than running off across the surface.
- Fewer but generous waterings: water less frequently, but make each watering count.
- Avoid overhead watering: wet foliage encourages fungal disease and increases evaporation.
If possible, use a drip hose or a simple perforated bottle sunk into the soil so water ends up right where the roots are. However, the biggest change comes earlier still - before the main watering season really begins.
The key job before watering season: mulching tomatoes correctly
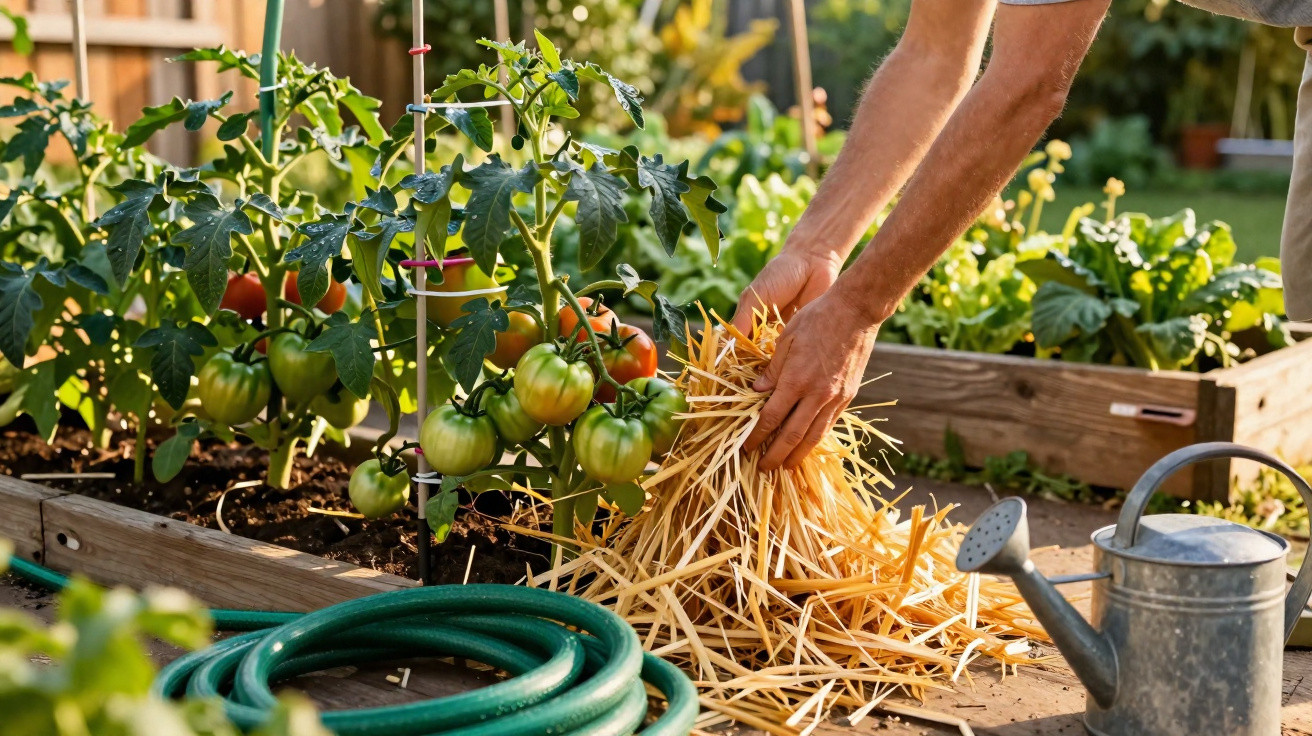
The step many people miss is mulching early enough. A protective layer on the soil slows evaporation and reduces the ups and downs in moisture levels.
"With a mulch layer, tomatoes often grow more vigorously and look noticeably healthier, because the soil stays evenly moist."
Without cover, the top few centimetres of soil dry out quickly. Roots then sit in the hottest, most changeable zone. Mulch works like natural insulation and brings several benefits:
- More even moisture: the soil holds onto water for longer.
- Temperature buffering: the ground heats up less and cools down less sharply.
- Less weed growth: reduced competition for water and nutrients.
- Gentler soil surface: less crusting, and rain or watering doesn’t hammer directly onto bare soil.
When to put down the mulch layer
Professionals recommend laying the first mulch in spring once the soil has warmed up - usually in March or April. Later, after planting out in May, you top up the mulch around the tomato plants.
Key rules to follow:
- Never mulch on bone-dry soil: water well first, then mulch so the existing moisture is locked in.
- Apply a 5 to 10 centimetre layer: too thin has little effect; too thick can rot if it stays wet.
- Leave a little space from the stem: don’t press mulch right against the stem, so nothing starts to rot.
Suitable materials for tomato mulch
Different materials work well depending on what you have available. Common options include:
| Material | Benefits | Notes |
|---|---|---|
| Straw | Light, well-aerated, protects against intense heat | Don’t compact it too firmly, or moisture can build up |
| Shredded leaves | Free, improves soil structure over time | Chop or tear first so they don’t clump together |
| Mature compost | Holds water and provides nutrients | Don’t apply too thickly, or you risk nutrient excess |
In practice, mixes are often easiest: for example, a thin layer of compost directly on the soil, with straw or shredded leaves on top as a cover layer.
How to water properly once tomatoes are mulched
Mulch also changes your watering rhythm. The surface may look dry, while the soil underneath can still be nicely moist.
"Before each watering round, you should reach under the mulch and check the soil - a finger in the ground beats any calendar."
A simple routine:
- Gently pull the mulch back a little around the stem by hand.
- Push a finger 2 to 3 centimetres into the soil.
- If it still feels cool and slightly moist, the watering can can wait.
- If the soil feels crumbly and dry, water slowly at the base so the water soaks in beneath the mulch.
Afterwards, move the mulch back towards the stem, but keep a small air gap. That way you create a protected zone: damp but not wet, airy but not dried out.
Common mistakes with tomato mulch - and how to avoid them
The method is straightforward, but mistakes still crop up quickly. Three pitfalls appear again and again:
- Mulching too early: if the soil is still cold, the layer slows warming. Wait until spring has properly arrived.
- Only watering the top layer: if you simply splash water over the mulch each week, you can end up wetting the cover while the soil beneath stays dry.
- Pressing mulch against a wet stem: this can encourage rot and fungal issues. A small clear space around the stem protects the plant.
Why mulch genuinely makes tomatoes “healthier”
The word “healthier” can sound vague, but with tomatoes it is easy to explain. More consistent soil moisture means fewer splits in the fruit, and the plant experiences less stress overall. Stressed tomatoes are far more vulnerable to diseases and pests.
Mulch also reduces the risk of fungal spores splashing up from the soil onto the leaves during watering or rainfall. The protective layer acts as a buffer between the soil and the plant. In wet summers, this can make the difference between a reasonably steady crop and a complete loss.
Practical example from everyday gardening
A typical situation: a hobby gardener plants tomatoes into a bed in May, waters conscientiously, then in July is puzzled by brown patches and fruit that keeps splitting. The following year, from April they spread a 5–7 centimetre mulch layer of straw with a little compost, regularly check soil moisture with a finger, and only water when the soil is truly dry. The result: stronger plants, less fungal infection and fruit that ripens much more evenly.
On light, sandy soils, this approach brings particularly noticeable gains because these soils hold water poorly. On heavy, very clay-rich soils, mulching is best paired with longer-term improvement using compost so waterlogging does not develop.
Combining mulch with other care measures
Preparing the soil before watering season does not replace other tasks - it complements them. Useful measures include:
- Sturdy canes or strings so plants are supported and not lying in damp conditions near the ground.
- A rain cover or tomato shelter to keep foliage as dry as possible.
- Targeted feeding in spring and again in summer, adjusted to your soil.
Together with a thoughtful watering strategy, a simple bed can quickly turn into a surprisingly resilient tomato patch. Once you get into the habit of checking under the mulch before watering, you soon notice how much water you can save - and how clearly the quality of the harvest improves.
Comments
No comments yet. Be the first to comment!
Leave a Comment