
When seed-starting pots run short, savvy gardeners have long since switched to a completely different everyday item – with surprisingly good results.
Anyone who buys seed packets with springtime enthusiasm soon discovers the same thing: there are never enough pots. That is exactly where a neat little approach comes in, quietly gaining ground in more and more gardens. It relies on a simple household material, saves space, money and plastic, and still produces sturdy young plants.
The idea behind the “snail seed strip”
To raise seedlings successfully, gardeners essentially need three things: a moist growing medium, steady temperatures and plenty of light. Traditionally, people use small pots or modular seed trays. The snag is that they take over shelves and windowsills at speed, and buying new ones year after year creates unnecessary waste.
“The snail method replaces whole trays of pots with a single, space-saving rolled seed strip.”
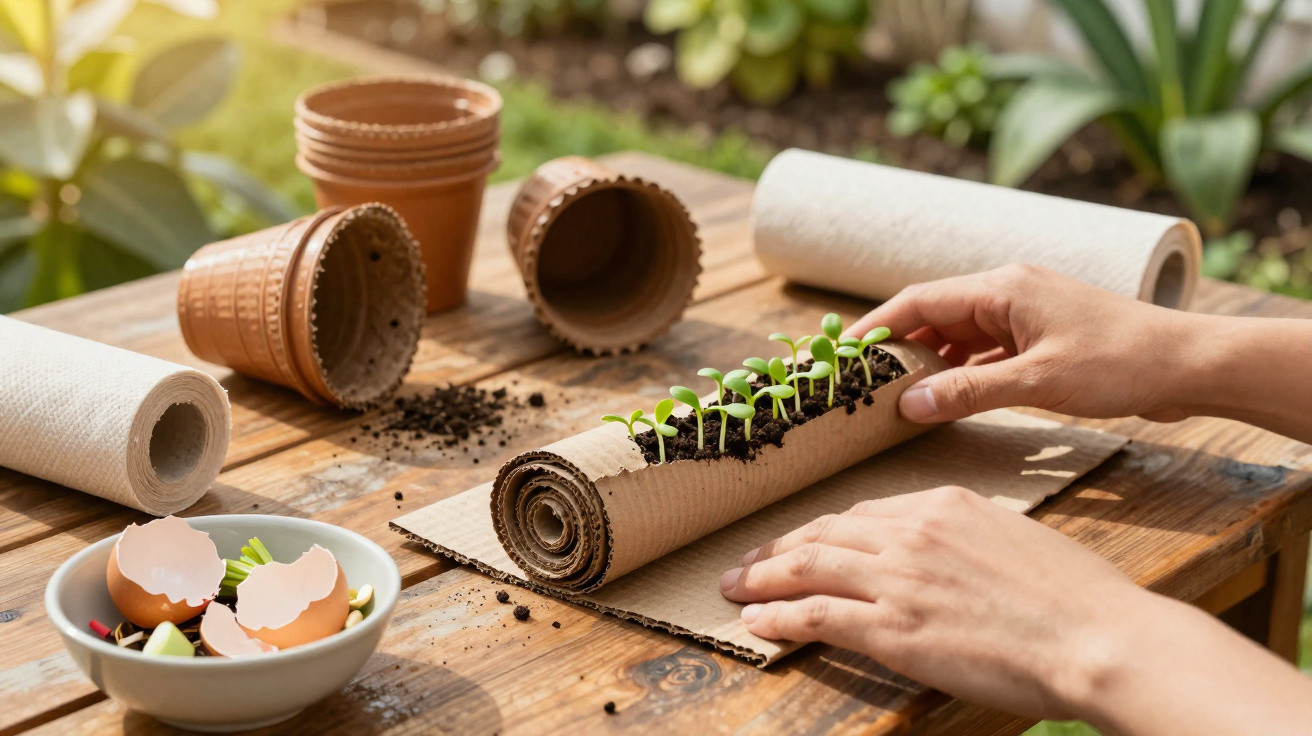
Here’s how it works: you take a flexible strip made from recycled material, line it with kitchen roll or fabric, spread on damp seed compost, place the seeds, and then roll the whole thing up tightly into a spiral. From above, it looks like a snail shell – hence the name. The roll sits in a shallow dish with a little water, and you have a mini greenhouse.
Why more and more gardeners are choosing the snail method
At first glance, this technique can look like an internet craft hack. Try it once, though, and it quickly proves itself as a practical, working method.
- Save space: one roll can stand in for a whole army of plastic pots on the windowsill.
- Cut waste: old freezer bags, carrier bags or newspaper get a second use.
- Easy pricking out: when unrolled, seedlings sit neatly side by side, and the roots are simple to handle.
- Moisture control: kitchen roll and compost hold water evenly, avoiding waterlogging that can happen in individual pots.
- Cost benefit: there’s no need to buy extra trays, pots or pricey soil blocks.
Balcony and city gardeners in particular, who need every square centimetre of windowsill, swear by it. In a single dish you can germinate hundreds of seeds – from lettuce to tomatoes.
Which everyday item replaces the pots?
The hero of the method is something most households already have: thin plastic or paper from day-to-day life. Common options include:
- cut-open freezer bags
- old, clean thin plastic carrier bags
- wide strips of newspaper
- offcuts of decorator’s polythene or clear covering film
These form the flexible base that can be rolled later. On top goes a layer of kitchen roll or a thin cloth to retain moisture. Only then do you add the seed compost.
“Instead of expensive seed trays, an old freezer bag, kitchen roll and a bit of compost are all you need for a snail roll.”
Step by step: making your own seed snail
1. Prepare your materials
For one roll, the following basic kit works well:
- one long strip of plastic bag or newspaper (10–15 cm wide)
- one layer of kitchen roll or a thin strip of fabric in the same size
- fine seed compost, lightly moistened
- seeds (e.g. lettuce, kohlrabi, tomatoes, peppers, flowers)
- a shallow tray, saucer or deep plate
Try to work on a flat surface so everything can be rolled up snugly later.
2. Layer the base and compost
Start by laying the plastic or paper strip on the table. Place the kitchen roll or fabric on top. This layer helps keep moisture right where the roots will be.
Next, spread a thin layer of damp seed compost. It should not be dripping wet – more like a well-squeezed sponge. Keep the layer fairly thin; if it’s too thick, rolling becomes awkward.
3. Sow the seeds and keep proper spacing
Arrange the seeds in a line near the upper edge of the compost strip. Leaving a few centimetres between each seed is enough to stop seedlings competing for space too early.
This approach is best suited to fine seed. Large seeds such as beans or peas tend to slip out more easily and usually do better in standard pots.
4. Roll it up into a compact “snail”
Now for the key part: gently roll the strip up from one side. Try to keep the compost in place as you go. The roll should be firm, but not overly tight, so water can later distribute evenly.
Stand the finished roll upright in a dish. From above, you’ll see the circular layers of compost – rather like a cinnamon swirl.
5. Water correctly and choose the right spot
Add a little water to the dish, but only enough that the lower edge of the roll just sits in it. The compost wicks moisture upwards like a sponge.
A bright spot that isn’t too hot is ideal, such as a windowsill with morning or evening sun. Strong midday sun can scorch delicate seedlings.
Care: keeping seedlings strong
In the first few days, it may look as though nothing is happening. Beneath the surface, however, the seeds are already hard at work.
- Keep an eye on moisture: the roll mustn’t dry out, but it also shouldn’t be sitting in deep water.
- Light from the start: as soon as the first tips appear, seedlings need plenty of brightness to avoid becoming leggy.
- Air movement: a slightly open window or a small fan helps prevent mould.
“If you regularly check with a finger that the compost is still slightly damp, you prevent both drought stress and rotten roots.”
When to unroll the “snail” again
Depending on the plant, the first true leaves appear after around two to three weeks. By then at the latest, it’s time to open the roll up bit by bit.
It works best if you lay the seed strip flat on the table and unroll it slowly. The young plants will be lined up neatly along the compost. Using the handle of a teaspoon or a dibber, you can lift each seedling with a small clump of compost.
Then move each seedling into its own pot or, if the weather is suitable, straight into the bed. For the first few days after transplanting, the plants appreciate even moisture and a little protection from full sun or wind.
Which crops are especially well suited
Not every plant enjoys this style of pre-growing equally. These generally perform best:
| Plant | Suitable for snail method? | Note |
|---|---|---|
| Lettuce | very suitable | fine seed, lots of plants in a small space |
| Kohlrabi, white cabbage & similar | very suitable | robust seedlings, easy to prick out |
| Tomatoes, peppers, chilli | suitable | need lots of light, ideal for bright windowsills |
| Flowers such as Tagetes, zinnias | suitable | great for colourful balcony planters |
| Peas, beans | limited | larger seeds slip more easily; better in pots |
Common mistakes and how to avoid them
Rarely does everything go perfectly on the first attempt. In practice, three issues cause the most frustration:
- Compost that’s too wet: seeds rot before they germinate. Fix: moisten compost lightly and top up the dish in small amounts.
- Too little light: seedlings stretch, become leggy and topple. Fix: a brighter position, and if needed use a grow light.
- Rolling too tightly: roots have too little room. Fix: roll a touch looser so air can reach the compost.
Once you know these pitfalls, you’ll get the hang of it quickly. Many gardeners say the second or third snail roll germinates far more evenly.
Why the effort is genuinely worth it
This method fits perfectly with the way many people now want to use resources more thoughtfully. Rather than buying new plastic trays, you can simply raid a drawer for old bags or paper.
At the same time, the snail roll offers a handy side benefit: you can see exactly when each seed splits, how roots develop, and how strongly plants respond to more light or water. That makes it particularly good for beginners and children who want to understand how growth works.
If you enjoy it, you can take the idea further: for instance, stand several narrow rolls of different varieties in one large dish, or try mixed sowings – such as lettuce and flowers that later move into the bed together. In that way, a simple household item becomes a remarkably clever tool for sustainable seed starting.
Comments
No comments yet. Be the first to comment!
Leave a Comment