
Many hobby gardeners only swap the pot in spring - then later wonder why the leaves turn pale and the lemons never arrive.
In April, the little lemon tree is set out on the balcony or beside the patio door: fresh compost in the pot, big hopes for home-grown fruit. And then… nothing. The plant barely puts on growth, the foliage looks tired, and blossoms are scarce. There’s one step professionals in nurseries carry out automatically at every repot - and many private growers miss it, even though it can determine how the whole season goes.
Why changing the pot alone won’t save your lemon tree
A lot of people repot like this: old pot out, a slightly larger pot in, new compost packed around the sides - job done. The roots are often left untouched as a tight, hard mass. That’s exactly where the trouble starts.
Citrus plants that sit in the same container for a long time develop a dense root mat. The roots circle round and round the pot and can even constrict one another. Horticulturists describe this as a root spiral or root ring. The result is a bonsai-like effect: the plant stays small, growth slows right down, and the new compost is only used to a limited extent.
"The decisive step: not just repot - actively break up the root ball and ‘groom’ it again."
Without that intervention, the root system keeps its “memory”: even in a bigger pot, the roots continue to grow in circles instead of pushing out into the fresh compost. Water and nutrients then reach the plant only imperfectly.
Signs of a stressed root ball on a lemon tree
Before you reach for the watering can or fertiliser in spring, it’s worth checking for warning signs. Typical symptoms of an overly matted root ball include:
- Roots protruding from the drainage holes in the base of the pot
- The root ball feeling rock-hard when you lift the plant out
- The compost drying out extremely quickly - or staying wet for a long time despite moderate watering
- Leaves looking paler, sometimes yellowish, and dropping more readily
- Hardly any new shoots, with few or no flowers
- Regular feeding making virtually no difference
The most misleading part: many owners respond to a weak-looking tree by applying more fertiliser. But if the root ball is compacted like concrete, it can’t absorb water and nutrients properly, and some of them simply run down the sides and out. The plant is effectively starving, even though you’re “spoiling” it.
How nurseries do it: the professional repotting routine
When nurseries repot citrus, they follow a consistent process. It doesn’t begin with new compost - it starts by freeing the old root ball. The best window is late winter into spring, roughly from late February to April, as the plant moves into active growth.
Step 1: Prepare the plant and moisten the root ball
First, stand the pot securely, tip it slightly, and loosen the edge using your hand or a wooden stick. If the root ball refuses to budge, a water bath can help: place the pot in a bucket of lukewarm water for about 15 minutes. The root ball absorbs moisture and becomes more flexible.
Then ease the plant out carefully, supporting the trunk with one hand just above the compost surface. Try to minimise root breakage.
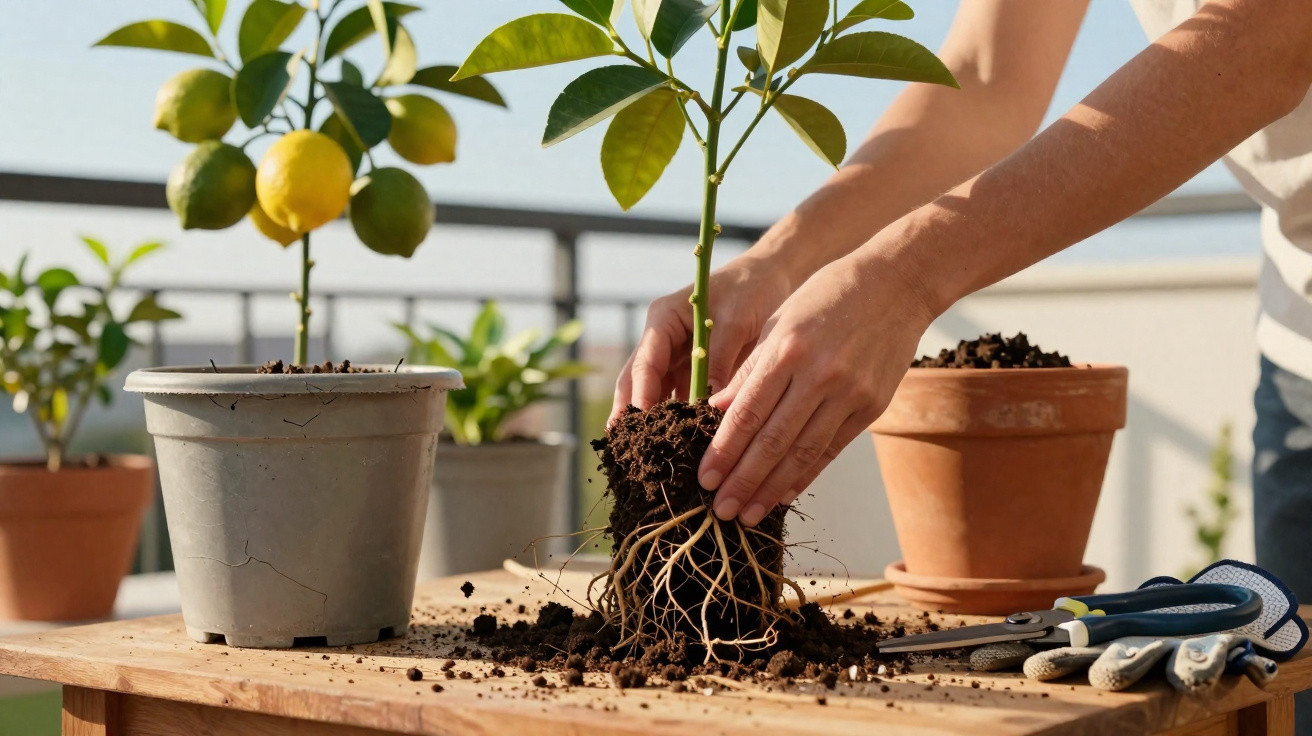
Step 2: Scratch and loosen the root mat instead of leaving it intact
This is the stage most hobby gardeners skip. Professionals deliberately work on the outside of the root ball. A sturdy metal fork from the kitchen is ideal.
- Place the root ball on a table.
- Using the fork, score the entire side and base of the root ball to a depth of about 2–3 centimetres.
- Comb the outer root loops outwards until the circular pattern starts to break up.
The goal is to open that tight ring so that fine new roots later form from the scored areas and grow into the fresh compost.
Step 3: Trim unhealthy roots
Once the root ball is opened, you can judge root health much more easily. This is when you want a sharp, disinfected pair of secateurs.
These roots can be removed:
- Black or very dark discoloured roots
- Mushy, soft, or hollow-feeling sections
- Broken ends and dried-out tips
The outer, overly long roots can be shortened by about 1–2 centimetres. The key is not to hack back thick main roots, but to work carefully. The aim isn’t to create a miniature bonsai - it’s to encourage a vigorous plant with lots of young, fine root tips.
Step 4: Reposition roots and choose the right pot
After trimming, spread the loosened roots out like a fan so they don’t immediately start circling again in the new container. One common mistake is the pot itself: going far too large tempts you to place the plant into compost that stays wet and isn’t quickly colonised by roots.
"Pro tip: the new pot should be only about 2 to 4 centimetres wider in diameter than the old one."
When you repot, set the root ball so that the transition from trunk to roots (the root collar) sits slightly above the compost surface. Fill the gap between the root ball and the pot wall with fresh mix, firm it gently, but don’t ram it down - otherwise you risk creating the next compaction problem immediately.
Which compost lemon trees actually prefer
Citrus plants are sensitive to the wrong potting mix. Compost that’s too heavy leads to waterlogging; mixes that are too light dry out too quickly. The sweet spot is a free-draining, slightly acidic blend.
A tried-and-tested ratio:
- 40% specialist citrus compost
- 40% loose garden soil or a high-quality, lightweight potting compost
- 20% additives such as perlite or broken expanded clay, or lava grit
At the bottom of the pot, a drainage layer of expanded clay or coarse gravel is worthwhile. It helps prevent standing water around the roots. The pH of the mix can sit in the slightly acidic range, roughly between 5.5 and 6.5.
The first few weeks after repotting: caring for a “freed” lemon tree
After this root treatment, the plant needs a little time to settle and re-establish. Harsh midday sun can add stress at this stage. A bright spot with plenty of light - but without scorching direct sun for the first 10 to 15 days - works well.
For watering, use a simple finger test: only water when the top 2–3 centimetres of compost feels dry. Tip away any excess water in the saucer straight away. Freshly trimmed roots should not be left constantly wet.
"Feed no earlier than after 3–4 weeks - before that, the tree focuses on healing and producing new roots."
After that, you can use an organic specialist citrus fertiliser every few weeks. If you prefer liquid feed, apply a weaker dose but do it regularly through the growing period from April to around August.
Typical mistakes - and how to avoid them confidently
The same container lemon tree problems crop up in gardens and on balconies year after year. Common culprits include:
- Pots that are far too large, leaving compost permanently damp
- Moving a compacted root ball into the new pot without loosening it
- Feeding too often while the roots are still in poor condition
- Putting the plant in full midday sun immediately after a major repotting intervention
- Pouring cold tap water onto warmed roots
Keep these points in mind, and make “grooming” the root ball part of your routine, and you greatly improve the chances of healthy shoots and abundant flowering.
Why the root spiral is so persistent
Many gardeners are surprised that the root ring returns even after repotting. The reason is simple: roots strongly follow existing structures. If the growth direction has been circular for a long time, that pattern continues unless you deliberately break it.
That’s why nurseries insist on roughening up the root ball and laying the loosened roots out in a star shape. Fine new root tips then grow preferentially into the loose, fresh compost and feed the tree more effectively. When it works well, the plant responds within a few weeks with delicate light-green new growth and glossy leaves.
How often your lemon tree needs this treatment
Container-grown citrus generally benefits from this root-and-pot routine every two to three years. If you time it for spring, you take full advantage of the natural growth phase. The tree can seal pruning wounds faster, develop fresh root tips, and at the same time set new leaves and flower buds.
In the long run, it’s this “hidden” step that separates a permanently troublesome container plant from a vigorous lemon tree that sets new fruit each year. So if, in April, you do more than simply change the pot - and properly tackle the root ball - you lay the groundwork for a stable harvest in late summer and autumn.



Comments
No comments yet. Be the first to comment!
Leave a Comment