
Across the Northern Hemisphere, anxious plant owners are watching once-lush leaves turn yellow and limp on their indoor jungles-right as central heating runs at full blast and daylight hours fade. The instinct is to reach for the watering can or a bottle of fertiliser, but an old woodland habit points to something much simpler-and far cheaper-that can help plants get through the coldest months and often look better for it.
Winter, radiators and the slow suffocation of houseplant roots
It is easy to blame winter trouble on cold temperatures. In a heated home, however, the more common problem is quieter: extremely dry indoor air alongside compost that stays wet for too long. Radiators strip moisture from the air and from leaves, while the bottom of a pot can remain saturated for days.
Through winter, plenty of familiar houseplants slow down. Growth eases back, sap flow is less active, and roots take up water at a fraction of their spring and summer pace. Yet the top layer of compost can appear dusty, particularly if the pot sits near a radiator.
That is when people add more water-and that is often when problems start. Excess water drains downward and displaces oxygen, leaving the root zone like a stagnant, poorly aerated bog. Fungi thrive, roots begin to rot, and the plant can fail from the base upwards.
"Yellowing, droopy leaves in January often point to too much water around the roots, not too little."
This gap between what the foliage seems to be “asking for” and what the roots can actually handle is why online plant communities see so much winter anxiety. Another driver is continuing to feed with fertiliser as though the plant were still in high-summer growth mode.
The unexpected ally on your windowsill: a single pine cone
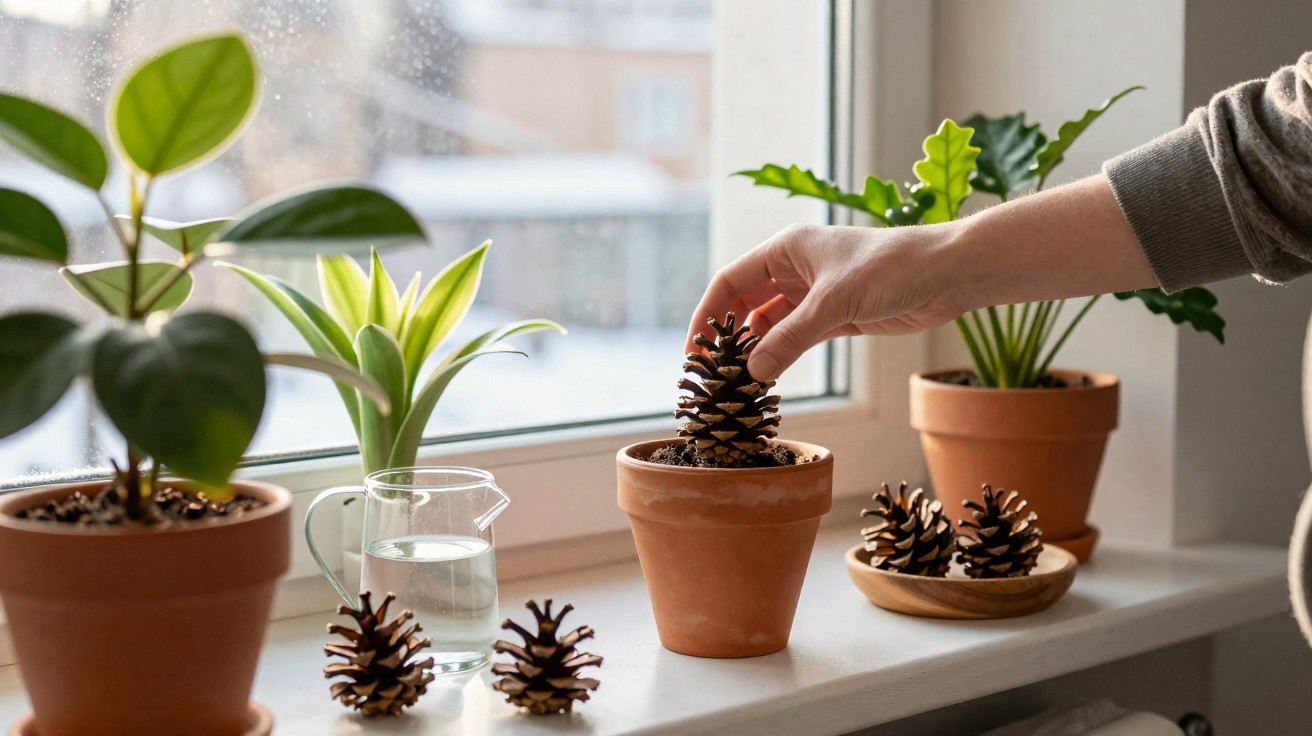
For years, rural gardeners in parts of Europe have used something most modern plant owners step over without a second thought: a pine cone. Not as seasonal decoration, but as a simple way to moderate moisture at the compost surface-and as a rough, natural signal of humidity.
Set a clean, dry pine cone on top of the compost and it works as a small buffer between the air and the soil. It is not acting like a sponge buried in the mix. Instead, it influences the thin surface layer where excess damp, mould and algae most readily develop.
"A pine cone on the soil behaves like a tiny live gauge, constantly reacting to changes in humidity around your plant."
Because of its woody structure, the cone can take up a little surface moisture, reducing the persistent wet sheen that encourages fungal growth. At the same time, the spaces between its scales let air circulate, helping the top layer stay breathable rather than forming a sealed crust.
Nature’s hygrometer: how a cone “tells” you when not to water
Pine cones are surprisingly clever bits of natural design. Their scales are hygroscopic, which means they shift position according to the moisture in the surrounding environment. The cone does not need to be fresh or seed-filled for this to happen; the fibres and wood still respond.
- Scales closed or tightly curved inwards: humidity is high. Either the room air is damp, or moisture is still evaporating up from the compost. Delay watering.
- Scales wide open and splayed: conditions are dry. Take this as a prompt to check further down with a finger or a moisture probe.
Unlike a quick touch of the compost surface-which can dry out first beside radiators-the cone offers a more continuous, reactive read on conditions. This can be particularly handy with dense potting mixes or wide decorative containers where the centre is hard to assess.
There is also a visual bonus. By picking up small amounts of surface damp, a cone can reduce the white or greenish crust that can appear on pots in winter-typically mineral residue from tap water combined with algae and harmless, but unattractive, moulds.
How to prepare a pine cone so you do not bring pests indoors
Picking up the first cone you see in a park and putting it straight into a living room is not the best idea. Woodland litter can carry insect eggs, tiny spiders and fungal spores. A short prep routine helps keep your plant shelf neat and your flat free of unwanted visitors.
Three-step “cone ritual” before it meets your plants
- Collect: go for cones that are already open, dry and undamaged. Cones that are closed and damp may split or leak sap as they dry.
- Clean: use an old toothbrush or a stiff paintbrush to remove soil, needles and moss. There is no need to scrub them spotless.
- Heat: arrange cones on a baking tray and dry them in the oven at around 90°C (about 195°F) for 20–30 minutes, or leave them on top of a radiator for several days. Let them cool fully.
Heating helps deal with larvae, beetles and some mould spores. Once the cone has cooled, rest a single cone on the compost surface-either centrally or near the base of the stems. Do not push it into the compost; it needs exposure to air as well as contact with the soil.
With large planters, using two or three cones can look purposeful, like a forest floor, while also increasing the area over which surface moisture is moderated.
Why winter is the wrong season for heavy fertiliser
The idea that a pine cone “feeds” plants better than fertiliser in winter is really about timing rather than secret nutrients. During the darkest months, most houseplants do not require routine feeding. Their roots are already navigating lower light levels, shorter days and fluctuating indoor temperatures.
"In winter, protecting roots from rot often does more for plant health than pouring in extra nutrients."
Fertiliser can encourage new growth, but limited light makes it difficult for plants to convert that boost into sturdy, balanced tissue. The outcome can be pale, leggy stems supported by roots that are already weakened by overly wet compost. A pine cone, in contrast, supports a steadier, more oxygen-rich root environment-often the closest thing to “food” a resting plant needs.
When spring arrives and days extend and fresh leaves start to push out, light feeding can begin again. Even then, cones can stay in place as humidity cues and as a decorative mulch, even if they are no longer doing the heavy lifting.
Other winter habits that keep your indoor jungle alive
The pine cone method works best when paired with a handful of basic winter tweaks. Treat it as one element of seasonal care, not a stand-alone miracle.
| Habit | Winter adjustment | Why it helps |
|---|---|---|
| Watering | Wait until the top few centimetres are dry before watering deeply. | Prevents chronic damp and root suffocation. |
| Placement | Move pots away from radiators and hot air vents. | Reduces leaf scorch and rapid surface drying. |
| Light | Shift plants closer to bright windows, without touching cold glass. | Supports photosynthesis during short days and avoids cold damage. |
| Cleaning | Wipe dust from leaves every few weeks. | Improves light absorption and reduces pests. |
City gardeners, in particular, often keep windows shut to hold warmth in, which reduces airflow. In still conditions, overwatered pots dry even more slowly, and fungal issues spread more easily. By slightly lifting and interrupting the compost surface, a cone can counter some of that stagnation.
Which plants benefit most from a pine cone “guard”?
This low-tech helper suits many classic leafy houseplants. Monsteras, ficus, pothos, peace lilies, dracaenas and parlour palms all fall into that awkward category: they like consistent moisture but cannot tolerate waterlogged roots.
For cacti and succulents, where compost should dry out much more thoroughly, a cone is less essential as a watering signal-but it can still highlight swings in room humidity. If a cone remains firmly closed for days near a radiator, it may point to condensation or poor ventilation, both of which can increase the risk of rot.
Avoid placing cones on plants that need persistently high, steady moisture at the soil surface, such as certain carnivorous species kept in water trays. Their requirements are specialised, and a drier buffering layer may be unhelpful.
What a pine cone can and cannot do for your plants
A pine cone will not rescue a plant that is already well into root rot. If stems feel mushy or the pot smells sour, the fix is repotting into fresh mix and trimming damaged roots-not a simple forest add-on. A cone is also not a substitute for proper drainage holes or an appropriate potting medium.
"Think of the cone as a gentle assistant: it warns, moderates and tidies, but it does not do your job for you."
Used early in the season, though, it can prevent that extra “just in case” watering that pushes roots past their limit. Over repeated winters, that small restraint can be what separates a plant that pulls through from one that ends up as compost.
Practical scenarios for using the cone trick at home
Picture a typical January flat: the thermostat reads 21°C, radiators are humming, and the curtains are half drawn. A monstera sits near a south-facing window. By Tuesday the compost surface feels dry, even though you watered on Sunday. The pine cone is still mostly closed. Instead of watering again, you wait. By Thursday the cone starts to open and the pot feels lighter-only then do you water, thoroughly but less often. Over the following weeks, the leaves stay glossy and firm.
In another scenario, a beginner receives a ficus as a gift. They place a cone on the compost and glance at it whenever they walk past. On damp days, when they might otherwise water out of habit, the closed cone nudges them to stop. That simple feedback loop often teaches a better feel for a plant’s rhythm than any calendar alert.
Beyond winter: using cones as part of a low-cost plant toolkit
Once you start, cones often find their way into pots outside the winter months too. Used alongside other straightforward measures-terracotta pots for breathability, coarse grit for drainage, and pebble trays for gentle humidity-they become part of a small, nearly cost-free care kit.
For beginners, there is an added mindset shift. Seeing an ordinary pine cone respond to living-room conditions makes microclimates easier to notice: the overheated spot near the radiator, the cooler bright area under a skylight, the draughty windowsill. That awareness usually leads to better placement, fewer impulse waterings, and a more relaxed response to the occasional inevitable yellow leaf.


Comments
No comments yet. Be the first to comment!
Leave a Comment