
The hose lies limp in the grass, the sun bears down, and the only sound is that soft gurgle as water runs into the beds. Your neighbour is watering for the third time this week, the lawn is steaming, and you start wondering how long you can keep going as water bills climb. In the veg patch the soil is starting to ripple with dryness; the tomatoes are hanging heavy, yet within hours the ground looks dusty again. Something is off. We pour precious drinking water onto the soil - and some of it disappears downwards before the plants even get a chance. Meanwhile, older gardeners tell you they “used to manage with half as much”. It sounds like a fairy tale. Or does it?
Why our usual watering routine wastes so much water
Walk through an allotment site in mid-summer and you see the same scene again and again: a sprinkler throwing half its water on to the path, a watering can tipped like a little waterfall across a bed. It looks reassuring - everything briefly shines with moisture. Yet within an hour, much of that dampness has either evaporated or drained away too deep. We’re giving plants a shower, rather than actually supplying them.
It isn’t magic, either - it’s straightforward physics. Watering from the surface tends to wet only the top few centimetres of soil, exactly where the sun hits hardest. The moisture vanishes quickly, and plants adapt by keeping their roots up high in that thin “comfort layer”. If, instead, water is delivered slowly down into the soil, roots are pushed to grow deeper, where moisture is stored for far longer. The plant becomes tougher and needs fewer top-ups. In other words, it’s not just how much you water - it’s where the water ends up, and how it gets there.
A hobby gardener in Brandenburg told me that after the last drought summer, she simply couldn’t keep up. Two hours of watering every evening, and the water bill went through the roof. When she compared her usage with the year before, she was almost 30 cubic metres higher - on a small plot. And still the beds looked tired: tomatoes split, herbs wilted at midday anyway. Only when she buried a simple system in the soil did her seasonal water use halve. In the second year she saved almost sixty per cent - without sacrificing yield.
The underground watering method: Olla, bottle & co.
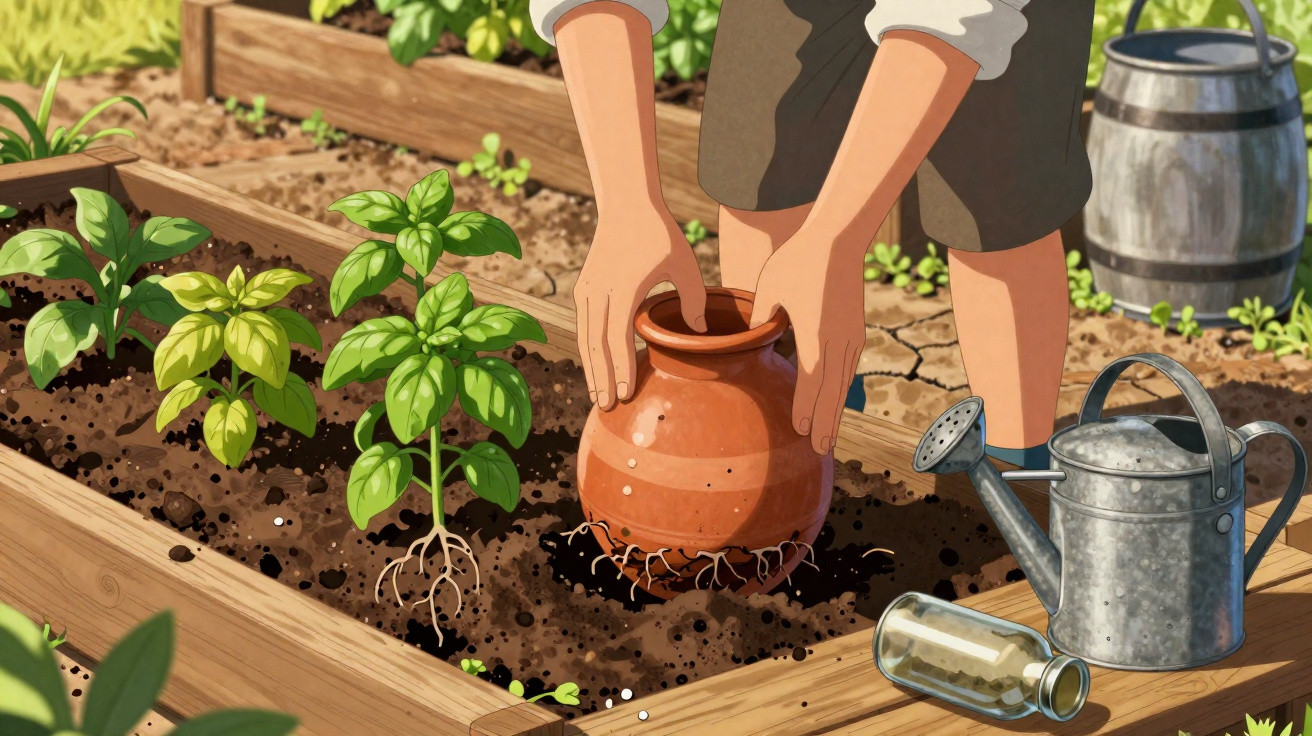
The approach that can cut water use by up to sixty per cent sounds almost absurdly simple: get water underground to the roots, instead of pouring it over the surface. The traditional version is the “Olla” - unglazed clay pots that have been used for centuries in Mexico, India, and across the Mediterranean. You bury them up to the neck, fill them with water, and the clay releases moisture slowly into the surrounding soil. Plants take only what they truly need. No spraying, no evening hose marathons.
If you’re picturing pricey specialist kit from a garden centre, pause for a moment. You can start with everyday items. Empty plastic bottles, old terracotta pots, even buckets with holes can work as a first step. There’s only one rule that matters: water must enter the root zone and seep out gradually - not gush out in one go. We all know that moment of impatience when we “just chuck it on properly”. And let’s be honest: hardly anyone waters as carefully every day as guides suggest. That’s why a method that takes some of the work off your hands is so useful.
So how does it work in practical terms? Imagine a pot or bottle sitting in the soil. Through tiny pores (in clay) or small holes (in plastic), water only moves out when the surrounding earth is drier than the water inside the container. The plant draws moisture, the soil dries slightly, and the clay responds by releasing more. When it rains, the opposite happens: the soil is already saturated, the pressure difference disappears, and the water largely stays in the vessel. The system regulates itself surprisingly well - no display, no app, just gravity and diffusion. That simplicity is exactly why it holds up during heatwaves.
How to put the underground watering method into practice
To begin, you only need one bed and a willingness to get your hands in the soil. If you want to buy Olla pots, choose unglazed clay vessels roughly the size of a medium flowerpot, ideally with a lid you can close. Bury them so only the neck remains above ground. Spacing should be around 30–50 cm, depending on the plant and your soil. With tomatoes, one pot is often enough for two to three plants. Refill the pot every two to four days instead of wetting the surface. After a fortnight you’ll notice the soil feels evenly moist - without turning soggy.
If you prefer a DIY option, use 1.5-litre plastic bottles. Cut off the base and make a few small holes in the lower third. Push the bottle into the soil next to the plant with the opening at the top, deep enough that the holes sit in the root area. Cover the top with a bit of fabric or an old pot lid so leaves and mosquitoes don’t fall in. Old terracotta pots can also work if you seal the drainage hole and close the top with a saucer as a lid. The principle stays the same: slow, targeted release instead of a flood.
The most common mistakes come from impatience or guilt. Many people add a “just in case” surface watering because the top layer looks dry. That’s exactly how you undo the benefit: the whole point is to encourage deeper roots, and surface moisture pampers the plant back into shallow rooting. Another classic error is cramming in too many containers in a small space so everything becomes saturated and roots begin to rot. Dare to do less. Tomatoes don’t need to sit in a permanently wet bath. A blunt line worth remembering is: more water doesn’t automatically mean more life.
“Since I buried the clay pots, I don’t spend summer pacing the garden with a stopwatch and a watering can,” says Karin, 62, who has been getting her Cologne city garden through ever drier summers for years. “I fill all the containers in the morning; it takes ten minutes. The rest of the day is mine again.”
- Plan one container per 30–50 cm of bed length; in very dry sandy soil, place them slightly closer together
- Refill only in the morning or late evening to minimise evaporation from the pots’ necks
- Mulch the surface around the containers (grass clippings, leaves, straw) to keep moisture in the soil for longer
- Once a month, check the containers aren’t blocked or being taken over by roots
- Pairing the method with rainwater pays twice: less mains water and gentler for many plants
What this simple idea does to the way we think about water
Once you’ve seen how little water can suddenly be enough, you look at your garden differently. Instead of the routine of “wet everything in the evening”, it becomes more like a calm conversation with the soil. You notice that a well-watered bed doesn’t have to shine on top - it holds moisture deeper down. After a few weeks with underground containers, those anxious checks of the weather forecast start to fade. The constant question of “Is it enough?” gets quieter, replaced by a new familiarity with your soil, your roots, and timescales longer than a single watering session.
What’s striking is that the method doesn’t only create technical independence; it also shifts your sense of responsibility. Water stops being an invisible stream from the tap that you “just use” when the lawn starts shouting. Each refill becomes a small, visible decision. You can see how long it lasts and how plants respond. That kind of direct feedback is missing when we simply “rain” water from above. Perhaps that’s the quiet, unspectacular value of this old technique: it doesn’t demand perfection. It simply helps you use less, without having to think about it constantly. And that’s what makes it so practical - in backyards, on balconies, on allotments, and now increasingly in professional vegetable operations too.
| Key point | Detail | Reader benefit |
|---|---|---|
| Underground watering instead of surface irrigation | Clay pots (Ollas) or bottles release water slowly directly in the root area | Less evaporation, up to 60% water savings with the same or better plant development |
| Easy DIY setup | Reuse plastic bottles or old terracotta pots, without major investment | An immediately workable solution that also suits a tight budget |
| Deeper roots, tougher plants | Plants “learn” to use moisture deeper down instead of staying near the surface | Less stress during heat, steadier harvests, and less daily watering effort |
FAQ:
- How much water do I realistically save with the Olla method? In real-world reports and small trials in dry regions, savings were usually between 40 and 60 per cent compared with classic watering from above. The hotter and windier your site, the bigger the effect.
- Does it work in pots and on a balcony? Yes - especially there. In large containers you can use small clay cones or mini bottles. That reduces how often potting compost dries out, without needing to water several times a day.
- Do I still need to water normally as well? During the settling-in period of the first one to two weeks, a light extra watering can help. After that, regularly refilling the containers is usually enough - provided the number and size match the plant.
- What happens to the buried containers in winter? Clay pots can crack in hard frost if they’re filled with water. Either lift them out before winter or leave them empty in the soil. Plastic bottles are less sensitive, but can become brittle over time and will eventually need replacing.
- Is the method suitable for large gardens or fields? For very large areas, professional drip irrigation systems are often more efficient. In intensive beds, permaculture zones, raised beds, or smaller vegetable areas, underground watering can still save a surprising amount of work and water even in a big garden.
Comments
No comments yet. Be the first to comment!
Leave a Comment