
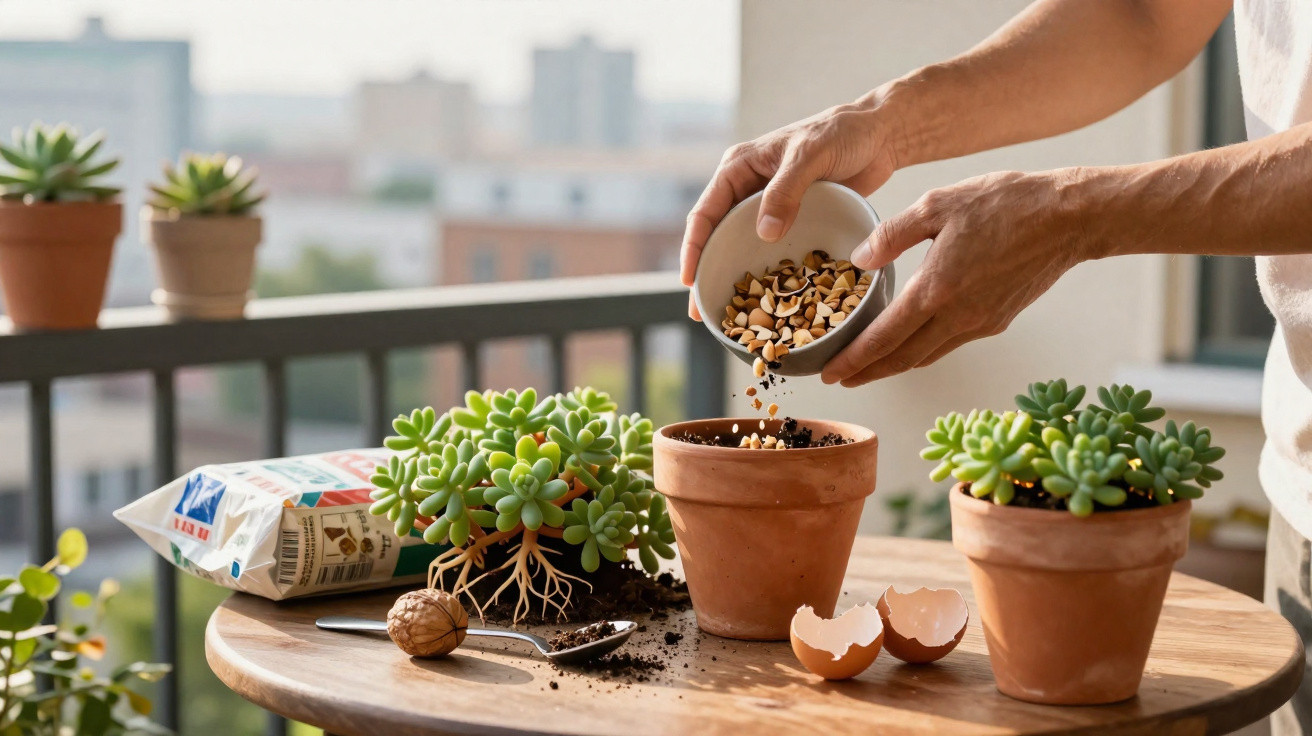
If Sedum fails in a pot or border, it’s rarely frost that finishes it off - it’s soggy roots. And that’s exactly where a surprisingly effective kitchen trick comes in.
Plenty of home gardeners are baffled when their usually bulletproof stonecrops suddenly turn yellow, go mushy and die back. In most cases it isn’t a fungus at all, but a basic mistake right at the bottom of the planting hole. Instead of lugging home pricey expanded clay pellets, you can use an unremarkable leftover from the kitchen that would otherwise be binned - and it can make a clear difference to plant health and growth.
Why Sedum often dies in pots despite being so tough
Sedum - commonly known as stonecrop (including varieties such as orpine and wall pepper) - has a reputation for being almost indestructible. It shrugs off heat, hardly ever suffers serious frost damage, and will grow happily in lean, poor soils. The real danger is underground: water sitting around the roots.
In both containers and beds, the same thing can happen quickly: repeated watering compacts the soil. The pores in the compost close up, water can’t drain away, and the pot or planting hole effectively becomes a little basin. With the roots kept wet, rot sets in and the plant can collapse seemingly out of nowhere.
With Sedum, it’s the base of the planting hole that decides life or death - not the spring feed.
A common knee‑jerk response is to head to the garden centre for expanded clay or gravel. That does work, but it makes pots heavy, costs money, and is simply awkward on small balconies. This is where a kitchen “waste” product comes in, offering the same benefit - surprisingly light and completely free.
The secret kitchen ingredient for perfect drainage
Germany’s environmental agency has encouraged people for years to make practical use of organic waste directly in the garden. For Sedum, these leftovers can be put to far better use than simply throwing them on the compost heap. The key materials are hard shells and pits.
These include:
- walnut shells
- hazelnut shells
- almond shells
- shells from unsalted pistachios
- crushed stone-fruit pits (e.g. peach, apricot, cherry)
- roughly broken eggshells
Normally these end up in the general waste or the food-waste bin. In a garden bed or balcony planter they can do much more: placed at the bottom of the planting hole, they form a loose layer around 3–5 cm thick, letting watering and rain drain away extremely quickly.
Kitchen scraps become a long-lasting drainage layer that protects Sedum for 2–3 years.
The clever part is how slowly nut shells and eggshells break down. Because they rot at a glacial pace, the physical drainage effect remains in place for a long time. Even after several growing seasons they still act as a supporting framework, helping to stop the compost at the bottom from compacting into a solid mass.
How to prepare nut shells and eggshells properly
Getting them ready takes only a few minutes and you don’t need any specialist tools. What matters is keeping the pieces chunky - not turning them into dust.
Step-by-step method
- Let collected nut shells, pits and eggshells dry out thoroughly.
- Put them into an old fabric bag or a sturdy jute sack.
- Strike the bag firmly several times with a hammer or a heavy wooden block.
- Break the shells only roughly - don’t grind them down; pieces can easily remain 1–3 cm in size.
- For eggshells, aim for curved fragments of about 1–2 cm that still keep their shell shape.
Those curved eggshell pieces are particularly useful because they create small air pockets. They hold air at the base of the pot and keep the structure very open. In balcony planters you’ll notice it immediately: water drains faster and the compost slumps less.
How to build the drainage layer for Sedum correctly
The setup is straightforward and basically the same every time - whether you’re planting in a pot, a window box, or a light border soil.
| Layer | Material | Guideline |
|---|---|---|
| Bottom layer | crushed nut shells and eggshells, pits | 3–5 cm |
| Intermediate layer | sandy, loose soil | thin, about 1–2 cm |
| Top layer | Sedum compost, ideally lean and mineral | remaining pot depth |
Start by covering the base of the pot or planting hole with the coarse shell mix. Add a thin layer of sandy soil next. Only then position the Sedum. This prevents the root ball from sitting directly on the chunky material, while still giving water a pathway downwards without pooling.
The aim isn’t fertilising - it’s permeability. The shells are primarily a water route, not a nutrient bomb.
Is this really enough - or do you still need expanded clay?
Many gardeners have relied on expanded clay pellets or gravel for years. These materials do the job, they’re durable, and they stay stable for a long time. For typical balcony boxes and smaller Sedum pots, however, they’re usually unnecessary once you’ve added a good shell layer.
Three rules make this method work:
- use only unsalted shells (no roasted, salted snacks)
- always crush them coarsely so air gaps remain
- add a sandy, very loose growing medium above
If you want to, you can combine approaches in large planters: a light layer of shells at the bottom, then smaller amounts of expanded clay above that. In day-to-day use, though, the kitchen-only option is usually more than enough for Sedum. The difference becomes obvious at the latest when the first plant has stood for years in a pot without any rot.
Especially practical for city balconies without a car
One benefit that’s easy to overlook is weight. Carrying heavy bags of gravel or expanded clay up to a fourth-floor flat puts many city residents off. Nut shells weigh next to nothing, fit in a small bag, and you’ll generate them at home anyway.
Tenants without a car gain the most: no hauling, no trips to the DIY store, yet still healthy Sedum in window boxes and pots. If you eat nuts regularly or cook with eggs, you can easily collect a bucket’s worth of drainage material over a winter - free of charge.
How long does the shell drainage last, and when should you top it up?
Hard nut and egg fragments decompose very slowly. Depending on location, moisture and temperature, they remain effective in the soil for around 2–3 years. Over time they break into smaller bits, the pores gradually close, and drainage performance drops.
A good time to refresh the layer is:
- when you’re repotting anyway
- when Sedum suddenly grows noticeably worse
- when water drains much more slowly from the holes
When repotting, it’s enough to replace the bottom layer and add fresh shells again. You can spread the old compost onto beds, where it will continue to help improve soil structure.
What’s happening in the soil, in detail
The shell pieces create large air spaces - so‑called macropores. These pockets don’t hold stagnant water; they hold air. Because the hard fragments act like a framework, the compost cannot compact as tightly. Water finds quick routes through the many gaps, moves downwards, and leaves through the drainage holes.
As a side effect, these organic leftovers release carbon and minerals very slowly. The process is so gentle that the character of the growing medium stays essentially unchanged. That suits Sedum perfectly: it doesn’t need rich compost, it mainly needs excellent drainage and a little structural stability.
More tips for consistently healthy Sedum plants
Drainage is the key building block, but it isn’t the only factor in Sedum care. Three simple adjustments are often enough to keep plants going for years:
- Growing medium: keep it lean and mineral; for example, mix multipurpose compost with sand, grit or fine gravel.
- Watering: water less often but thoroughly; allow the compost to dry out clearly in between.
- Position: as sunny as possible; avoid any cover directly above that could cause water to collect.
Combine these points with the shell drainage layer and you create conditions stonecrops naturally prefer: low nutrients, no waterlogging, and plenty of light. Pots, wall crevices and balcony boxes can then gradually turn into long-lived, low-maintenance mini steppes - without heavy bags, without a special budget, and with a simple trick from your own kitchen.



Comments
No comments yet. Be the first to comment!
Leave a Comment