
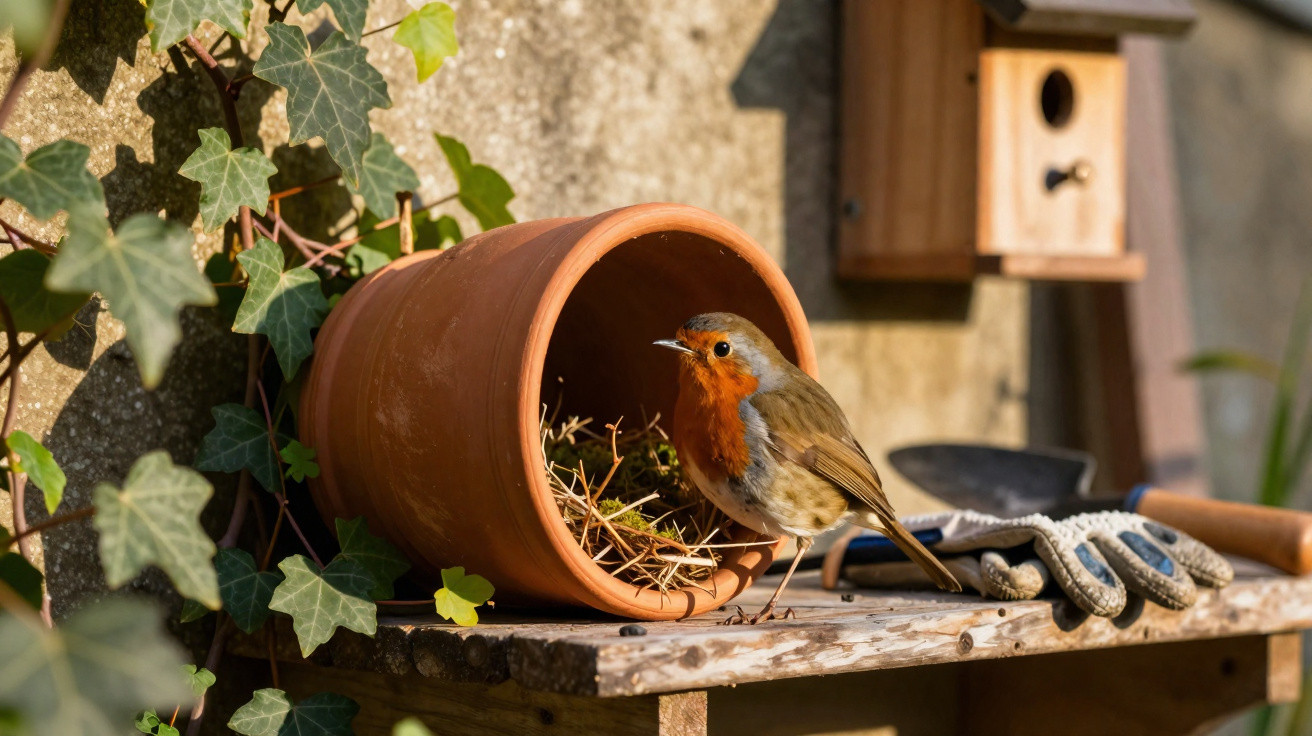
Anyone who has a robin in the garden will recognise the pattern: it hops about confidently between the beds, perches less than 2 metres away on the spade - and yet it never moves into the lovingly hung wooden box. While tits and sparrows readily take to the standard nest boxes, robins often have different ideas. The deciding factor is not what the nesting site costs, but whether it suits the species. That is exactly where the humble clay pot comes into its own.
Robins behave differently from tits
Plenty of DIY-store packaging proudly says “bird nest box”, but the design is usually intended for hole-nesting birds such as blue tits or great tits: a small entrance hole, a closed box, positioned high up in a tree. For a robin, that approach is simply wrong.
According to bird conservation organisations, the robin is classed as a semi-open nesting species. It avoids tight, elevated cavities and instead looks for:
- wide openings in well-sheltered recesses
- hiding places close to the ground
- dense hedges, ivy-covered walls and scrubby borders
- discreet spots that offer protection from view and from rain
From a robin’s perspective, a classic box fixed 3 metres up on a smooth house wall is essentially useless. Robins prefer the lower parts of the garden, in the transition between lawn, perennials and hedge. That is where they hunt insects - and that is where they also look for nesting sites.
“If you really want to help robins, you need to see the garden through their eyes: low down, dense, hidden and as unshowy as possible.”
Why a clay pot provides ideal conditions
A terracotta pot, or any similar unglazed clay pot, surprisingly ticks many of the boxes a robin demands from a breeding site. Compared with plastic or varnished wood, clay acts like a small, natural climate regulator.
Clay regulates moisture and temperature
Terracotta is porous. In a very real sense, the pot “breathes”:
- It absorbs moisture from the air and releases it again slowly.
- Less condensation forms inside - which can be vital for chicks.
- The clay stores a little warmth during the day and gives it off gently at night.
Nest boxes made from thin timber or plastic can quickly become damp and clammy inside. In cool springs, nestlings are extremely sensitive to humid draughts. A solid clay pot, by contrast, functions more like a snug, well-insulated hideaway.
A wide opening instead of a tiny entrance hole
Robins do not want to squeeze through a narrow tunnel. They favour semi-open cavities that are easy to access. For a pot, that means:
- an ideal diameter of 15 to 20 centimetres
- do not reduce the opening or fit entrance plates
- a clear view to the front, with protected edges all around
A standard unglazed plant pot typically meets these requirements almost automatically - provided it is positioned correctly and lightly “set up”.
Turning a plant pot into a robin nesting site
In practice, it only takes a few simple steps to turn an old plant pot into a fully functional nesting spot. Most gardens already have what you need.
Choosing the right pot
To get started, you only need:
- an unglazed clay pot, with no varnish or glaze
- a diameter between 15 and 20 centimetres
- rinsed clean, without soap or harsh cleaners
- free of stickers, foil or eye-catching paintwork
Glazed or brightly painted pots may look decorative, but to a robin they are more likely to feel threatening. They reflect light and can be easier for predators to notice.
Correct position and lining
The pot should not stand upright - it needs to be tipped onto its side. Key points:
- Angle the pot slightly downwards so rainwater can drain out.
- Secure it with stones, pieces of wood or wire so it cannot wobble.
- Add a thin layer of dry leaves inside.
- Place a little moss on top as a base for later nest building.
Robins prefer to build the nest themselves, but a “started” cavity can make the site more appealing. Too much material, on the other hand, can put them off - the bird still wants to arrange it in its own way.
Location: where the clay pot is actually accepted
Many attempts fail because the pot looks perfect but ends up in the wrong place. Robins choose breeding sites with extreme care.
Height and orientation
An ideal fitting height is around 1 to 1.50 metres. That keeps the pot just above typical cat height, while still clearly within the robin’s preferred zone. For orientation:
- turn the opening towards south-east if possible
- so morning sun and drier air can reach the interior
- while still offering protection from prevailing westerly winds
A full south-facing position in strong midday sun can overheat the inside, while north- or west-facing spots often stay too cool and are more exposed to wind.
Hidden away rather than a decorative feature
Robins like discretion. Good locations include:
- deep inside a dense hedge
- behind, or within, ivy on a bank
- under overhanging shrubs at the edge of the garden
- in a wilder corner with longer grass and deadwood
Less suitable are:
- open lawn areas with no cover
- paths that are used frequently
- places with constant activity from dogs or children
- prominently painted or “decorated” spots
“The less people notice the clay pot, the greater the chance a robin will judge it to be safe.”
Timing: don’t start too late
If you only put the pot out in a rush in April, you will often miss the first brood. Robins start looking for territories early and need time to assess a new site.
The best period for installation is late February to mid-March. By then, many birds are already active in gardens but are still searching for nesting opportunities. If the pot is ready and left undisturbed at that point, the odds of success rise noticeably.
Once it is in place, the rule is: hands off. Repeated checks, handling or moving it around can deter birds. It is better to watch from a few metres away to see whether a robin tests the entrance or carries in material.
If it doesn’t work: change the location, not the whole idea
Sometimes the pot stays empty in the first season. That does not mean the method is flawed - more often, one detail simply isn’t quite right.
Useful adjustments include:
- moving the pot into a denser hedge
- adding structure nearby with a little deadwood and leaf litter
- reducing disruptive light sources or draughty wind exposure
- limiting cat access with thorny branches or low fencing
Major changes during the breeding season are not a good idea. It is better to fine-tune things during the quieter period between seasons.
What garden owners should also keep in mind
A clay pot on its own does not turn a garden into a robin paradise. If you want robins to stay long-term, a few basics matter:
- Pesticide-free areas: insects are their main food; sprays destroy the food base.
- Structured variety: a mix of lawn, perennials, hedges and deadwood provides both cover and forage.
- Quiet zones: at least one corner of the garden that is rarely used.
- Water source: a shallow bowl or small pond, cleaned regularly.
Many robins use the same garden for years when they find suitable breeding spots and safe refuges. In gardens where shrubs are still young, the clay pot can become a key element.
Practical examples and extra ideas
If you do not have a suitable clay pot, you can use similar containers, as long as they are discreet, weather-resistant and designed with an open front. Suitable options include:
- old metal watering cans laid on their side
- upturned galvanised tubs with a side entrance
- half-buried wooden boxes with a wide opening
The crucial combination remains the same: shelter, dryness, camouflage and a low-down position. Many gardeners report that robins will even nest in old buckets laid on their side, or between stacked planters - if the location is right.
If you have children, setting up a robin hideaway like this can work well as a small nature project. Agree a fixed viewing distance, no reaching inside, and quiet movements from the outset. That way, even the youngest learn that helping wildlife is mainly about consideration and calm - the clay pot is simply the tool.

Comments
No comments yet. Be the first to comment!
Leave a Comment