
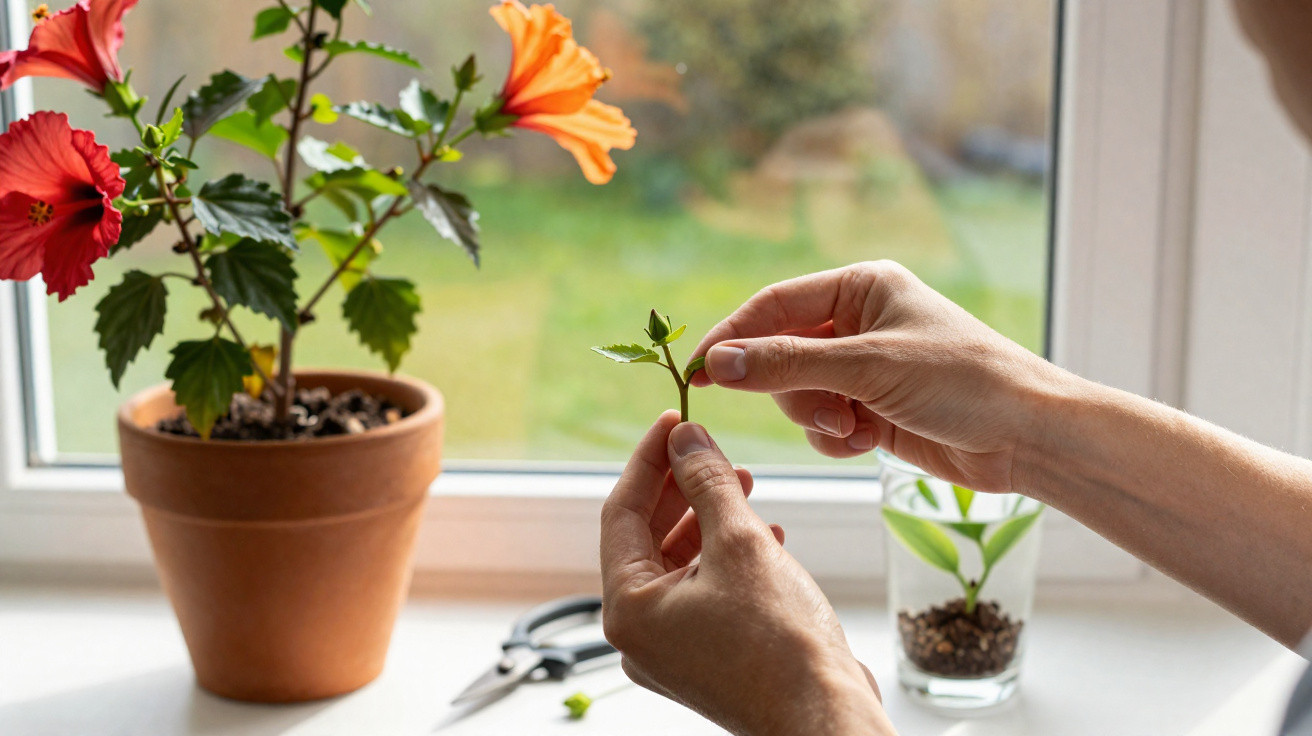
Many hibiscus owners will recognise the pattern: a small cluster of flowers at the top, bare stems lower down, and long, thin shoots stretching towards the window. By late winter the plant can look tired and a bit forlorn. Right in this phase-between the end of winter and the start of spring-there’s a straightforward move that can make the number of blooms surge, as long as you do it at the right time and in the right place.
Why March is the decisive month for hibiscus
As winter draws to a close, hibiscus is already preparing to restart from the inside. The days lengthen, temperatures begin to rise, and the plant switches from conserving energy to active growth. Sap starts moving through the shoots, buds begin to wake up, and hormone activity increases noticeably.
That’s why this window-roughly from early March to mid-April-is considered ideal for stepping in and guiding growth. At this point, hibiscus has enough energy in reserve to respond quickly, but it still isn’t under the heat stress of summer. Cuts and care interventions recover fast, the plant regrows strongly, and it copes with small “operations” far better than it would in midsummer.
The impact is particularly clear with:
- Hibiscus rosa-sinensis in a pot on a windowsill or in a conservatory
- Hibiscus syriacus in a garden border or in a container on a balcony or patio
- Hibiscus moscheutos, once its fresh shoots appear in spring
"If you intervene correctly during this short time window, you redirect growth away from long, bare stems and towards lots of flower-rich side shoots."
The 3-second move: how flower clusters can double
The core trick sounds almost too easy: you remove the very top bud point from a young, soft shoot tip. Gardeners call this pinching out. It takes only a few seconds per shoot, but it has a major effect on branching.
How to do it step by step
Choose a shoot that has already put on some growth and carries around three to four pairs of leaves. The tip should still be soft and flexible-not woody.
- Wash your hands, and disinfect fingernails or your tool (small scissors) with alcohol.
- Take a quick look at the shoot tip: where is the last pair of leaves, and where is the next node?
- Grip the tip between thumb and forefinger just above a node.
- Pinch it off with a clean, swift motion-or snip it with small, sharp scissors.
That’s all there is to it. The intervention really does take around three seconds per shoot. What matters is that you only work on young, non-woody sections and that you don’t remove a fully formed flower.
What’s happening behind the scenes: apical dominance
In the background, a basic principle of plant biology is at work: apical dominance (the dominance of the shoot tip). The topmost bud on a hibiscus produces plant hormones-especially auxins. These substances suppress the growth of dormant side buds.
As long as the tip remains untouched, the plant prioritises upward growth, while side shoots stay weak or don’t develop at all. Once you remove the tip, the auxin source disappears and the plant suddenly redistributes water and nutrients.
"By removing the shoot tip, you release the brake on the side buds-one bare stem becomes two or three new, flower-bearing branches."
In practical terms, one upright shoot becomes two or three branches within a few weeks. Each of those new branches can then form buds in turn. Realistically, that means at least double the number of flowering shoots-often more if you pinch lightly again later.
Typical problem case: the “feather duster” at the window
The difference is especially striking with hibiscus kept indoors behind glass. They grow strongly towards the light, become increasingly dense at the top, and progressively bare at the bottom. Without a countermeasure, they can end up looking like an extended feather duster with a few flowers at the tip.
This is where the 3-second trick acts like a reset. Pinching out the tip forces the plant to activate lower buds. It pushes fresh growth nearer the base, develops a more compact, bushier shape, and later spreads flowers across the whole plant rather than only at the crown. As an extra help, rotate the pot a little every one to two weeks so the hibiscus doesn’t “wander” towards the window pane on one side.
What you should never pinch
Despite how simple it is, there are a few clear boundaries to respect:
- Don’t pinch thick, heavily woody branches with your fingers-those require a proper, thought-out pruning cut.
- Don’t remove shoot tips that already carry a clearly developed flower bud.
- Don’t pick at a weakened or unwell hibiscus-first identify the cause (pests, waterlogging, nutrient deficiency).
If conditions are reasonably good, the first new side shoots usually appear after two to three weeks. During this phase, hibiscus benefits from plenty of light, even moisture in the compost, and a modest feed.
Put the cut tips to work: free new hibiscus plants
The small shoot tip doesn’t have to go in the bin. If it’s around 10 cm long, it makes an excellent cutting. That way you can raise new plants at no extra cost.
Cuttings in compost: the classic method
How to prepare a hibiscus cutting for rooting in soil:
- Cut the cutting at an angle directly below a node.
- Remove all leaves from the lower section so nothing rots in the compost.
- Leave two to four leaves at the top and halve each one to reduce transpiration.
- Dip the cut end briefly into rooting powder or into a tea made from willow twigs.
- Insert it into a pot of very loose, lightly moist compost.
Place the pot somewhere bright but out of harsh, direct sun, at temperatures of around 15 to 20 °C. Keep the compost lightly moist, not wet. After a few weeks, new leaves appear-an indication that roots have formed.
Cuttings in a glass of water: the easy option
The even simpler version uses water: place the prepared cuttings into a glass of tap water, ensuring no leaves sit in the water. Change the water every two to three days to prevent bacteria building up. In good conditions, the first roots often appear after around two weeks.
"A single cut delivers a double benefit: more flowers on the parent plant and free new hibiscus plants from the removed tips."
Care around the March trick: how to support the plant properly
For the 3-second move to deliver its full effect, hibiscus needs the right conditions. A few factors make the biggest difference:
- Light: as bright as possible-indoors right by the window; outdoors a full-sun to very bright position.
- Water: even moisture, but no waterlogging. Don’t let the rootball dry out.
- Fertiliser: from March onwards, regularly but moderately-about every two weeks with a flowering-plant feed.
- Temperature: for indoor hibiscus, 18 to 23 °C is ideal; garden hibiscus should stay sheltered until after the last frosts.
If you get these basics right, you’ll see not only more shoots, but also clearly more buds and longer flowering periods. Hibiscus generally responds very positively to a combination of light, warmth, nutrients and targeted pinching out.
What “apical dominance” means-simply explained
The term may sound like university-level biology, but in everyday gardening it’s directly linked to whether you get plenty of flowers-or hardly any. Auxins concentrate in the shoot tip and essentially tell the plant: “Grow upwards; everything else can wait.”
Remove that command point and other hormones, including cytokinins, have more influence. They encourage side buds that were previously held back to start growing. That’s why a tiny intervention at the top can change the entire growth habit of a hibiscus-from a long-stemmed “giraffe” into a rounded flowering shrub.
Risks, common mistakes and how to avoid them
The method isn’t completely risk-free, but the typical pitfalls are easy to sidestep. If you pinch too late in the year-well into midsummer-you may remove buds the plant has already set. In that case, the main flush of flowers can be pushed back or end up weaker. Stick closely to the timeframe from early March to, at the latest, mid-April.
Another common issue is cutting too roughly or using dirty tools. Bacteria or fungal spores can enter the fresh wound. A clean blade or disinfected fingernails reduces that risk significantly. And if the hibiscus is clearly struggling-whether from spider mites, root damage or heavy leaf loss-health comes before shaping. Only once it’s growing strongly again is the 3-second move truly worthwhile.
If you try the technique on one or two shoots first, you’ll quickly learn how your own hibiscus responds. Many hobby gardeners say they reach for the scissors every early spring afterwards-because they can see the change from a weak, leggy stem to a densely flowered ball with their own eyes.
Comments
No comments yet. Be the first to comment!
Leave a Comment