
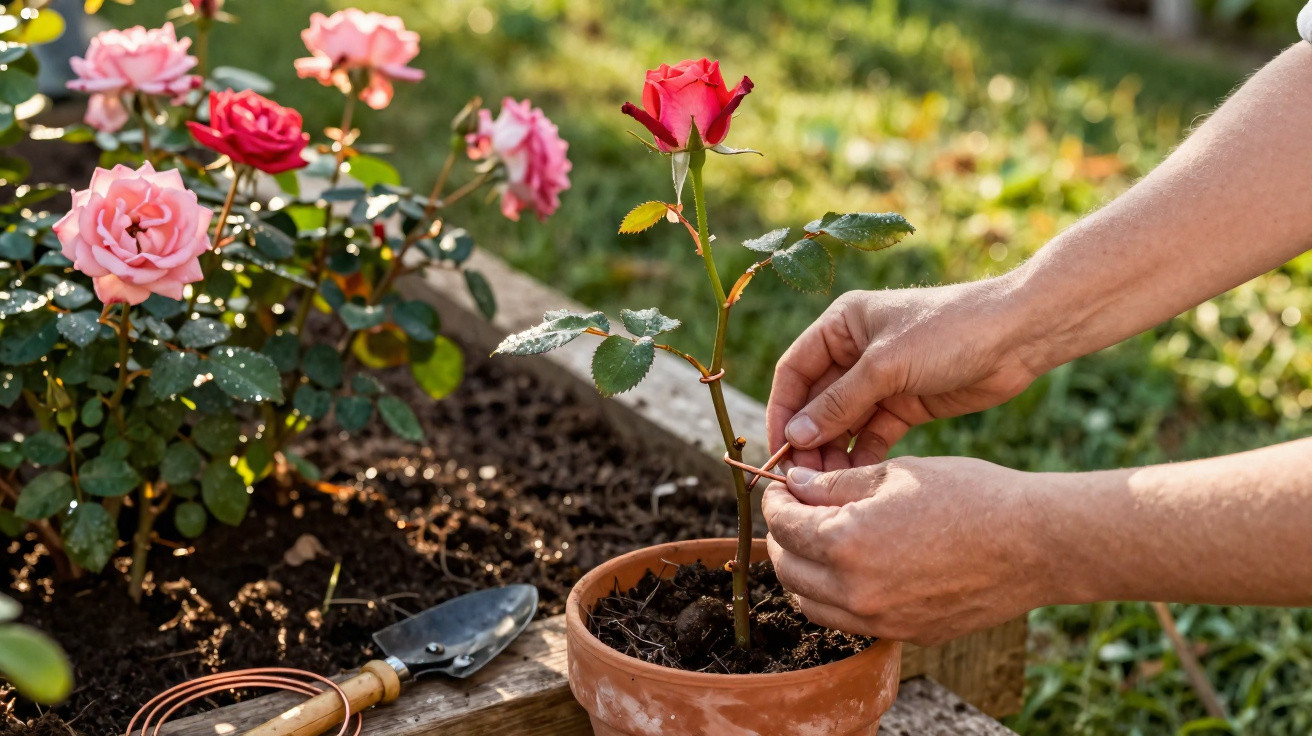
Many amateur gardeners cut off any rose shoot tip that looks past its best. Yet those canes often still have enough vitality to produce a completely new plant. The key is a straightforward wire trick that taps into a time‑honoured gardening principle - with no expensive products and no specialist kit.
Why a “dead” rose cane is often not lost at all
A grey, thorny cane with hardly any leaves can look like an obvious candidate for the secateurs. In plenty of cases, however, sap is still moving through that wood. As long as the shoot isn’t fully dried out or turning black, it is still active inside.
"As long as the wood isn’t bone-dry, the sap flow can be redirected - and that is exactly what the wire trick takes advantage of."
The approach is simple: instead of removing the cane, you encourage it to form its own roots. The result is a new, self‑sufficient rose bush that preserves the original variety and often grows away more vigorously than a weakened parent plant.
This can help, for example, with:
- rescuing a badly damaged, old rose bush
- propagating a treasured variety from your grandmother’s garden
- rejuvenating historic roses in the border without having to buy new plants
What happens inside: vessels, hormones and a root “cushion”
To see why a small piece of wire can have such a big effect, it helps to look at what runs through a rose cane. Inside are two key transport systems:
- Xylem: carries water and minerals from the roots upwards
- Phloem: sits just under the bark and transports sugars and growth hormones downwards
If you wrap a soft wire about 1–2 mm thick around the cane and tighten it, something useful happens: the phloem is partly compressed, while the xylem continues to do its job. So the plant still pushes water upwards, but the “return route” for sugars and hormones backs up at the pinch point.
"This build-up of sugars and auxins creates a thickened ridge above the wire - a root cushion from which new roots develop."
In practice, this initial rooting response typically forms within three to six weeks. The best windows are early spring, when sap is rising strongly, or late summer, when the plant is still active but no longer in full-throttle growth.
How to choose the right shoot and fit the wire loop
Success depends on picking the right cane. Ideally, use:
- a shoot from the previous year
- healthy wood with no splits or blackened patches
- a thickness roughly like a pencil
Position the wire about 15 cm above the base of the cane. Tighten it until the bark is visibly indented, but not so tight that you fully cut through the shoot. It sounds delicate, but with a little feel for it, it’s surprisingly manageable.
A soft steel wire is perfectly adequate, although copper wire often works even better. It is kinder to the bark and can also offer a degree of protection against rot in the damp area around the small injury.
Minimal effort: what you need for the wire trick
Most of what you need is already in a typical DIY shed:
- flexible wire (1–2 mm), ideally copper wire
- flat‑nose pliers and clean, sharp secateurs
- a pot or planting container with a saucer
- a mix of 50% loose multipurpose compost and 50% coarse sand
- a clear plastic bottle or a propagator cover as a mini greenhouse
- a label with the date, so you can track the timing
Two routes to a new rose bush: in the ground or in a pot
Option 1: Layering directly into garden soil
This method suits you if the parent rose will stay in the border and there is enough space around it.
- After fitting the wire, wait three to six weeks until a visible swelling forms above the constriction.
- Then dig a small trench about 10 cm deep.
- Refill the base with a sand-and-compost mixture.
- Carefully bend the marked section of the cane down, lay it into the trench, and pin it in place with a U‑shaped piece of wire or a hook.
- Cover everything back over with soil and mark the spot.
The layered section remains connected to the parent plant over winter. The following spring, you can check whether enough roots have formed. If so, separate the new plant with a clean cut between the mother bush and the rooted section, then move it to its permanent position.
Option 2: Rooting in a pot
If you don’t have room to layer into the bed, or you want tighter control, the pot method is a good alternative.
- Once the root swelling has formed, cut the cane off just below the wire.
- From this piece, prepare a hardwood cutting about 15–20 cm long.
- Insert the shoot two‑thirds of the way into the prepared sand‑compost mix in the pot.
- Lightly moisten the compost and place a clear bottle (base removed) or a cover over the top.
- Put the pot somewhere bright but not in full sun, and keep the compost evenly and lightly moist.
"Fresh shoots or noticeable resistance when you gently tug the stem show: the rose has formed roots and is ready for the garden bed."
The right time to separate and plant out
With layering in the ground, patience pays off. Only when a dense mat of roots has formed in spring should you cut between the parent plant and the new root ball. Plant the young rose into loosened, free‑draining soil, ideally with a little compost worked into the planting hole. A sturdy stake helps prevent wind damage.
The pot method needs a bit more hands‑on care: first, remove the cover gradually so the young plant can acclimatise to drier air. Water sparingly - the compost should stay fresh but never waterlogged. Plant out during a frost‑free period, either in spring or in early autumn.
How reliable is the method - and what are the limits?
Seasoned gardeners report that this technique can deliver impressively high success rates on old, non‑grafted roses. In many cases, around nine out of ten treated shoots take, whereas classic cuttings fail much more often with difficult varieties.
Even so, the wire trick isn’t risk‑free. Common pitfalls include:
- tightening too hard, causing the cane to die off completely
- keeping the compost permanently wet, which encourages rot at the wound site
- choosing the wrong timing, particularly when the plant is stressed or short of water
- using shoots from very weakly grafted or diseased roses that have limited reserves
Why copper wire can be especially helpful
Copper has a particular reputation in the garden because, in small amounts, it can inhibit fungal growth. Used on an already slightly injured area, the wire can provide a modest extra benefit: moisture and fungal spores have a harder time attacking the bark. Even so, it remains crucial not to leave the area constantly wet.
That’s how a cane you were about to prune away can become a valuable replacement - for instance, when an old favourite rose has been badly damaged by frost, fungal disease or rabbit/deer browsing. Once gardeners successfully root one such “rescue cane”, they often use the technique deliberately to propagate rarer varieties at home.
Practical additions for long-term healthy, free-flowering roses
The wire trick doesn’t replace good aftercare for your new rose. Once established, young roses need:
- a sunny to lightly shaded position with good air movement
- a loose, humus‑rich soil that holds moisture without becoming waterlogged
- restrained pruning in the first few years, so a strong framework can develop
- targeted feeding in spring, for example with an organic rose fertiliser
Later on, you can apply the same approach to other ornamental shrubs as well - such as currants, climbing hydrangeas or certain clematis varieties. It can be especially useful where a branch is growing in the wrong direction or getting in the way: instead of simply cutting it out, you can try putting it to work via the wire trick.

Comments
No comments yet. Be the first to comment!
Leave a Comment