
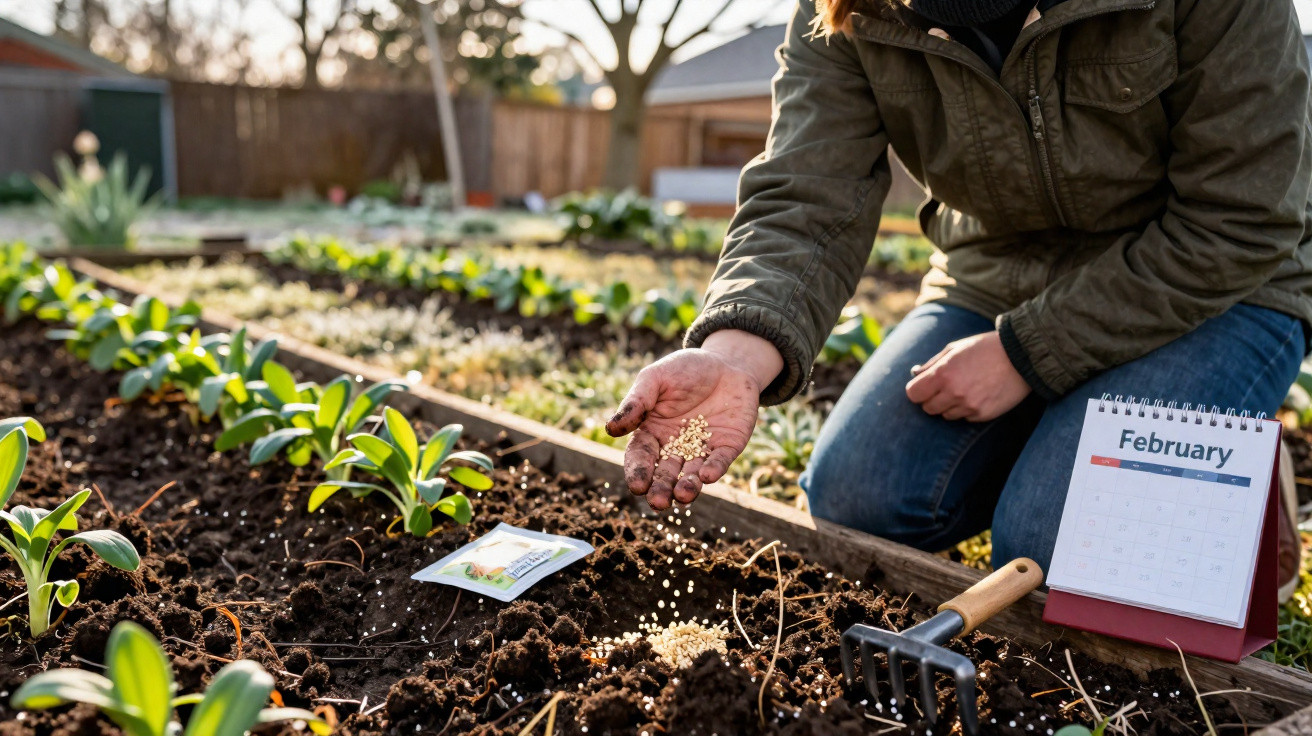
If you simply sit and wait right now, you’re leaving potential on the table. With a quiet, often-overlooked sowing, you can give your soil around a month’s head start. No bagged fertiliser, no heavy machinery - just a deliberately sown green ally that sets the stage perfectly for whatever you plan to grow next.
Why white mustard (Sinapis alba) changes the soil
Many amateur gardeners leave beds bare over winter. The result is predictable: rain leaches nutrients, wind dries the surface, and weed seeds seize every gap. This is exactly what green manure is for - a crop you grow not to harvest, but to improve the soil.
A particularly useful option is white mustard (Sinapis alba). It can get going once the soil reaches about 5 degrees. While the rest of the garden still looks dull and lifeless, it starts to germinate and quickly spreads into a low, green carpet.
"This plant isn’t harvested - yet it works harder for your garden than many a bag of artificial fertiliser."
Its big advantage is simple: instead of the soil sitting exposed, the plant cover shields it. Weed seeds get very little light, the delicate crumb structure is protected from heavy rain, and the roots create fine channels throughout the ground. The bed ends up looser, better aerated and noticeably easier to work.
How the “green carpet” works in practice
Protection from weeds and erosion
Once the young plants begin to put on height, they shade the entire bed in short order. For many common weeds, that means too little light and too little room - they never really get started.
- the surface stays covered rather than bare
- weed seeds are less likely to germinate
- sludge and run-off after heavy rain are reduced
- the soil surface doesn’t dry out as quickly in the wind
At the same time, the roots push down and open up the soil without you having to dig. Where you might otherwise battle with a spade or a powered cultivator, the plant quietly does much of the heavy lifting for you.
A natural nutrient store for the next crop
As it grows, the plant absorbs nutrients from the soil - especially nitrogen. Instead of that nitrogen being washed out over winter, it is held in the leaves and stems. When you later cut the growth and incorporate it shallowly, soil life gradually converts the plant material back into available food for your vegetables.
"You’re storing nutrients from the winter season in plant matter - and releasing them again in spring right as your vegetable crops get going."
In trials from 2018 to 2022, yields after using this kind of green manure rose on average by about 18 percent. Crops established more strongly, suffered less from weed competition, and benefited from improved soil conditions.
The right timing: why mid-February is ideal
The key is to catch the moment when the ground is no longer deeply frozen, but still hasn’t fully shifted into spring mode. In many areas, the window from mid-February to early March works well.
| Step | Recommended period | Note |
|---|---|---|
| Sowing | Mid-February to early March | Soil should be starting to thaw, not frozen |
| Emergence | approx. 7–14 days after sowing | faster in mild, damp weather |
| Cutting down | approx. 6 weeks after sowing | act before full flowering |
One important point: don’t wait for the beds to look “ready”. Even if frost nights are still possible, sowing can succeed. The plants are surprisingly tough, as long as the ground isn’t waterlogged for long periods.
How to sow this soil improver correctly
Simple bed preparation
You don’t need to dig the bed over deeply. It’s enough to loosen the surface a little:
- scratch up the top few centimetres with a rake or cultivator
- break down large clods
- remove rough plant debris from last year
The aim is straightforward: the seeds need contact with the soil, rather than sitting on a hard, sealed crust. If the ground is compacted, you can lift it gently with a digging fork without turning it completely. That way you protect the soil life.
Method and seed rate
Sow broadcast - in other words, scatter the seed by hand across the bed. It looks unremarkable, but it works extremely well.
- 1–2 grams per square metre is plenty
- for a 10-square-metre bed you only need 10–20 grams of seed
- rake in lightly or cover by no more than 1–2 centimetres
Afterwards, lightly firm the area using the back of a rake or the soles of your shoes. This closes air pockets and anchors the seed in place. The natural winter moisture usually takes care of the rest.
Cutting down and incorporation: timing is everything
Around six weeks after sowing, the bed will usually be covered in a dense stand. This is the point where you mustn’t miss your moment. Leave it too long and the stems become woody, and the plants start forming their own seed. Then a helper can quickly become a nuisance.
"Cut the stand as soon as the first flower buds show - not when the bed is already glowing yellow."
A scythe, sickle or sharp garden shears are enough for the job. Leave the cut material on the surface and work it in shallowly - 3 to 5 centimetres is sufficient.
Avoid burying it too deeply. In low-oxygen layers the material breaks down far more slowly and can even begin to rot. In the top layer, earthworms and microorganisms process the plant remains much faster.
What you can realistically expect
If you support your soil this way through late winter, you’ll usually notice the difference as soon as you start your first spring crops:
- the soil crumbles more easily and sticks less to tools
- seedlings find a fine structure that roots can move through
- weed pressure is noticeably reduced
- vegetable plants establish faster and develop stronger leaves
The roughly 18 percent yield increase observed in trials isn’t magic - it’s the combined effect of small gains: more active soil biology, nutrient release at the right time, and less stress from weeds.
Important notes and possible pitfalls
This green helper comes with a few rules:
- prevent seed set - otherwise the plant itself can become a “weed source”.
- don’t sow into waterlogged soil, as the seed can easily rot.
- after cutting down, don’t leave the material for weeks before incorporating it.
If you frequently grow cabbage, rocket or other brassicas in the same beds, it’s wise to switch to a different green manure from time to time to keep disease pressure from soil-borne pathogens in check.
Practical examples for use in the home garden
Sowing is especially worthwhile on areas that won’t be planted until later in spring - for example beds destined for tomatoes, peppers or squash. While radishes may already be growing elsewhere, these beds can keep “working” under their green cover.
The effect is particularly clear on heavy clay soils: after a late-winter green manure, beds can be levelled more quickly and are less prone to crusting after rain. In drier regions, the living cover helps keep moisture in the soil for longer, which can make it easier for young vegetable plants to get established later.
Related approaches and smart combinations
If you like the method, you can vary it through the year. After early potatoes, for instance, summer mixes of phacelia and clover can work well; in autumn ahead of winter, rye or winter vetch can follow. That way the soil is hardly ever left bare, which can give soil life a significant boost.
There’s another upside too: many green manures attract pollinators if you allow parts of them to flower. With the mustard type described here, it’s best to do this only at the edge or in narrow strips, so you keep unwanted self-seeding under control.
Anyone thinking long-term should plan these green in-between crops as part of the rotation - they’re not just gap-fillers, but a fixed building block of the growing plan. A modest winter sowing can ensure your soil doesn’t merely “tag along”, but actively supports you well before you place the first vegetable seed in the ground.



Comments
No comments yet. Be the first to comment!
Leave a Comment