
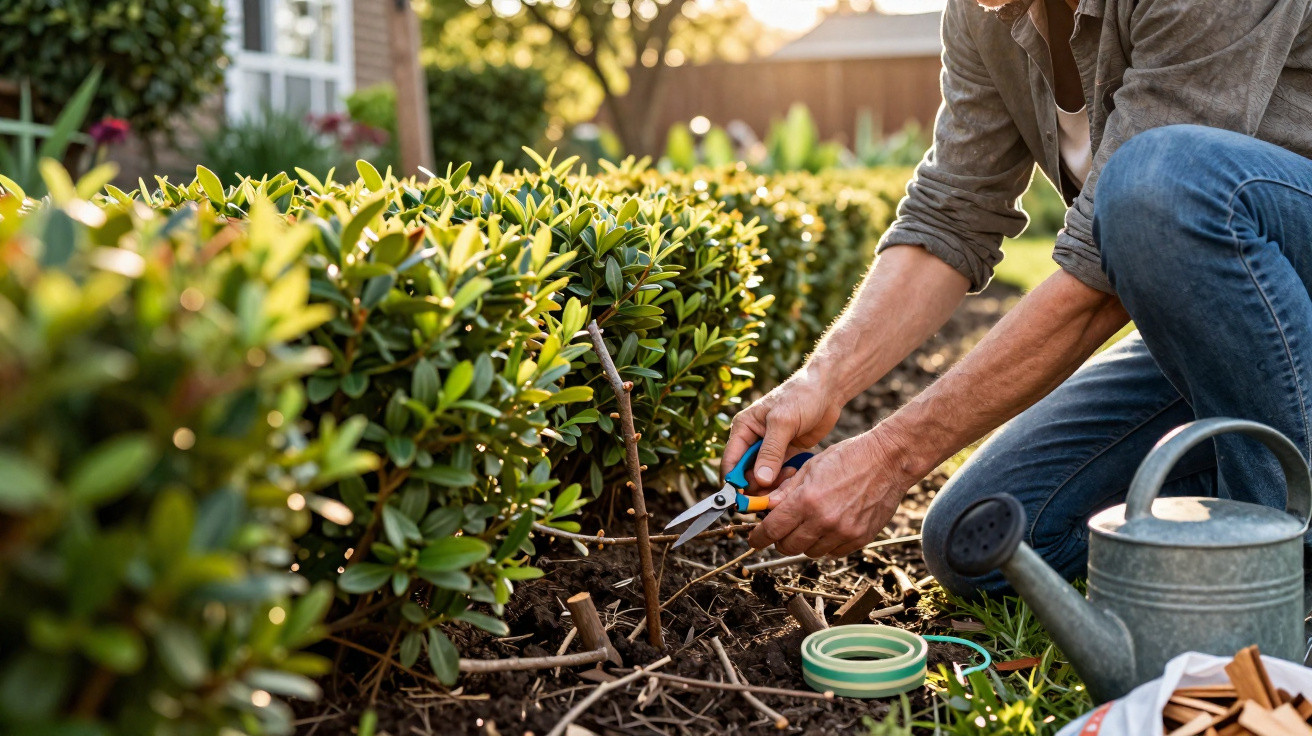
A hedge with bare patches instantly looks scruffy and lets the wind and prying eyes straight through.
With a simple, almost free technique, you can often encourage those gaps to fill in again within just a few weeks.
When a hole opens up in a hedge, many gardeners automatically reach for their wallet. Yet in a surprising number of cases, you can tackle the issue using the plants you already have. What matters most is careful observation, a deliberate pruning approach and a little patience - rather than buying more shrubs every time.
Why new shrubs often don’t save a hedge
Spot a gap and the usual reaction is a quick trip to the garden centre. It feels straightforward: something’s missing, so you plant something new. In reality, this fix often disappoints.
A young shrub suddenly has to compete with older, well-established neighbours. Those mature plants steal light, water and space. The newcomer struggles, grows slowly and can lag behind the rest of the hedge for years.
There’s another catch: the “missing section” often isn’t truly empty. In many cases the hedge has simply lost its shape, become weakened or gone bare on the inside. If that’s the real problem, adding plants won’t help much - because the underlying cause hasn’t been addressed.
“Before you spend money on new hedge plants, check whether the existing shrubs will reshoot on their own with the right pruning.”
Look closely: is the hedge actually dead - or just tired?
Before you pick up a spade or open your purse, a quick inspection is worth it. Plenty of branches that look lifeless are still alive.
The fingernail ‘scratch test’
A simple check is enough: lightly score the bark with a fingernail or a clean knife.
- If the tissue underneath is green and moist, the shoot is still alive.
- If it’s brown and dry, that branch really has died back.
Branches that are alive but weak can often be pushed back into growth. Especially in older hedges you’ll find long, bare shoots that only carry leaves at the tips. With the correct cut, these can reshoot and help close gaps.
The role of light and airflow
Hedges that are allowed to get very dense, or that sit in deep shade, tend to go bare inside much faster. The outer growth blocks light from reaching the base, and the plant sheds leaves or needles there. From the outside it can look like a “hole”, when the real issue is a lack of light and air within the hedge.
In situations like this, selective thinning is often far more effective than squeezing in an extra shrub. By removing individual branches and preventing the hedge from becoming too wide, you allow light to reach the lower areas - and the plants respond by thickening up again.
The pruning trick that can close gaps within weeks
The most effective lever is often right next to the gap: a targeted cut-back of the surrounding shoots. This effectively forces the hedge to produce fresh side growth, helping it knit the hole together.
How to make the right cuts
All you need is a sharp, clean pair of secateurs. Work steadily rather than rushing - a handful of precise cuts is usually enough.
- Shorten the branches around the gap by roughly one third.
- Make each cut at a slight angle, just above a bud.
- Where possible, choose a bud that points towards the gap.
This technique deliberately redirects growth. The plant can’t simply keep extending upwards, so it responds by producing more lateral shoots. The hedge becomes denser, not just taller.
“Targeted pruning slows height and encourages width - so the hedge grows into the gap rather than past it.”
The best time for a ‘restart’
Early spring is ideal, when sap is rising and the plants are just about to burst into growth. At that point, hedges often answer within a few weeks with fresh green shoots.
A late-summer cut can work too, but there’s less time for new growth to harden before winter. Either way, any heavier pruning should be done in frost-free weather so the cut growth doesn’t suffer frost damage.
When a new shrub does make sense
Sometimes even the best pruning won’t bring a hedge back: if whole plants have died outright or there’s severe frost damage, replacement is hard to avoid.
Choose the right variety
If you do replant, keep it consistent. The replacement should be the same species as the rest of the hedge. Different types can grow to different heights and widths, and at different speeds, which quickly makes the hedge look uneven - and makes routine trimming harder.
Leave enough space
New shrubs shouldn’t be crammed straight into an old mass of roots. A bit of breathing room is essential.
- Depending on vigour, leave 40 to 60 centimetres between the new plant and the next established shrub.
- Dig a generously sized planting hole and loosen the soil.
- Spread the roots carefully, don’t plant too deep, and water in thoroughly.
That way the young shrub can establish its own root system instead of constantly fighting mature plants for every drop of moisture.
Water and mulch: the underrated helpers
Whether you’ve pruned hard or planted anew, success is unlikely without water. In the following weeks, aftercare is what makes the difference.
Water properly rather than ‘a little every day’
Many gardeners water too often but too lightly. It’s better to water less frequently but thoroughly. That allows moisture to soak deeper and encourages the roots to grow downwards too.
- Water regularly for 4 to 6 weeks after pruning or planting.
- Give a deep soak once or twice a week, depending on the weather.
- Avoid waterlogging - the soil should be damp, not saturated.
Mulch as a protective layer
A 5 to 8 centimetre layer of organic mulch at the base of the hedge acts like insulation. Suitable materials include:
- chipped branches or bark pieces
- dried grass clippings
- shredded autumn leaves
- straw or other plant residues
Mulch helps the soil stay moist for longer, suppresses weeds and breaks down gradually into valuable humus. Just don’t press it right up against stems and trunks, as that can encourage mould.
How to keep your hedge dense in the long term
Once the gap has filled, the real ongoing task begins: maintaining the hedge so new holes don’t appear in the first place.
Five simple maintenance habits
- trim lightly once or twice a year, rather than cutting back brutally every few years
- after heavier pruning, water deliberately for a few weeks
- top up the mulch layer in spring when needed
- remove weeds at the base regularly so they don’t compete for water
- keep an eye on weak or thin areas early and shorten them selectively
This not only keeps the hedge thicker; it also looks tidier and provides better privacy and shelter from wind. A dense green barrier can also reduce noise and create a more protected garden microclimate.
Practical examples and useful tips for hedge owners
With fast-growing species such as privet or hornbeam, a confident spring cut is often enough to close even larger gaps. Thuja or yew tend to respond more slowly, but with the right care they can still produce fresh green growth around the edges of the gap.
If you’re unsure how much you can safely remove, take it in stages: two lighter rounds of pruning are usually safer than one cut that goes too far. After each cut, look back into the hedge - if light is reaching the main stems again, the chances are good that new shoots will emerge from within.
The real risk comes from cutting hard back into old, brown wood. Many conifers won’t reshoot from that material. So before you prune, always check whether there are still green sections with buds present.
By following the steps above, you not only save money on replacement plants. Your hedge will become more resilient because it can thicken up under its own steam. Particularly during dry summers, a robust, well-cared-for hedge pays off - it stays greener for longer, shields the garden more effectively and looks consistent from end to end.



Comments
No comments yet. Be the first to comment!
Leave a Comment